![How to Set Up an iPad for a Child: Complete Safety Guide [2025]](https://tryrunable.com/blog/how-to-set-up-an-ipad-for-a-child-complete-safety-guide-2025/image-1-1766594418164.jpg)
How to Set Up an iPad for a Child: Complete Safety Guide [2025]
You're about to hand your kid an iPad, and honestly? The responsibility can feel overwhelming. You want them to have access to educational content, stay connected with family, and explore the digital world. But you also want to protect them from inappropriate content, limit screen time, and maintain their privacy.
Here's the good news: Apple's built-in parental controls are surprisingly robust. When you set them up correctly, you get granular control over what your child can see, who they can talk to, and how much time they spend on the device. The catch? You need to configure things before handing over the iPad, not after.
This guide walks you through every step. Whether you're setting up a brand-new iPad, repurposing an old one, or adding parental controls to a device your child already uses, you'll find practical instructions and real-world recommendations based on thousands of parents doing this exact thing.
The process takes about 30 minutes from start to finish. You'll create an Apple ID for your child, enable Family Sharing, configure Screen Time limits, and lock down content restrictions. After that, you'll have visibility into what your child is doing while giving them age-appropriate independence. Let's get started.
TL; DR
- Create a managed Apple ID for your child under 13 directly from your own device using Family Sharing
- Enable Family Sharing to supervise purchases, control app downloads, and manage screen time across devices
- Set Screen Time limits with downtime hours, app category limits, and communication restrictions
- Enable Content & Privacy Restrictions to filter inappropriate content and control app permissions
- Fine-tune privacy settings by disabling location sharing, restricting AirDrop, and enabling Communication Safety for sensitive image detection
- Use Safari restrictions and Communication Limits to protect your child from adult content and unwanted contact

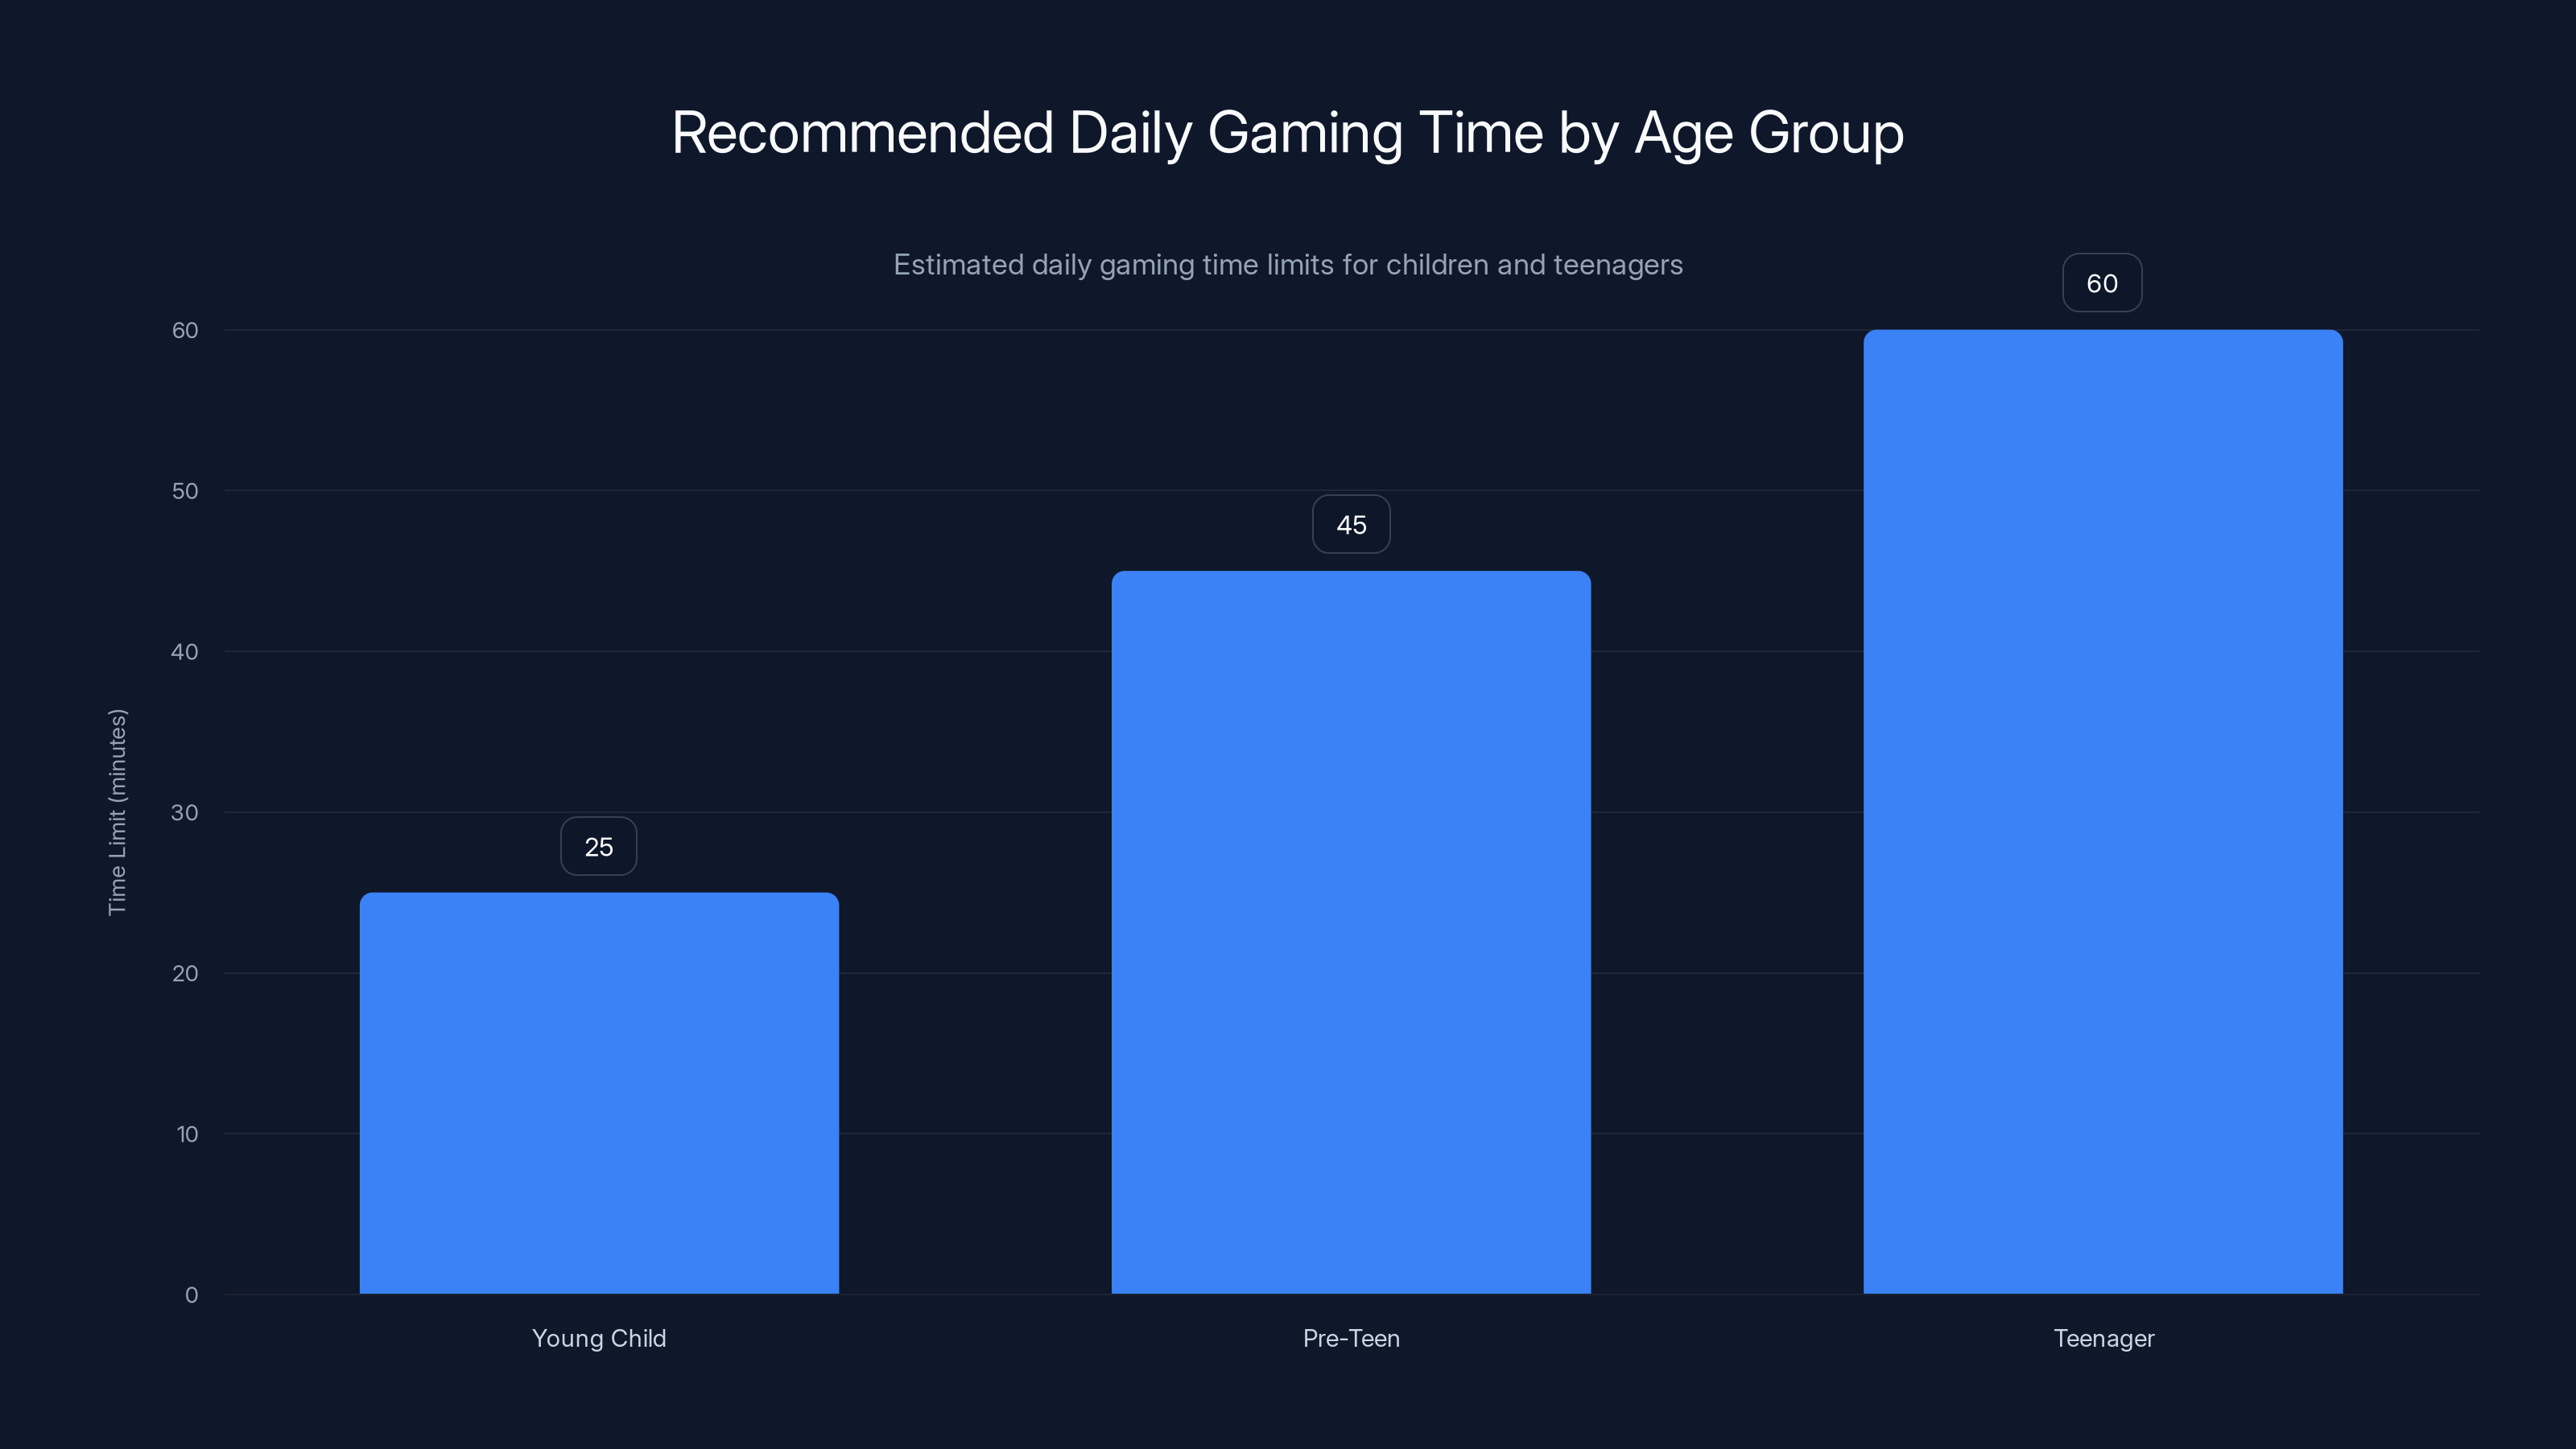
Estimated daily gaming time limits suggest 20-30 minutes for young children, 45 minutes for pre-teens, and up to an hour for teenagers to promote balance and prevent addiction.
Why Proper iPad Setup Matters for Child Safety
Setting up an iPad for a child isn't just about convenience. It's about creating a digital environment that matches their developmental stage while keeping them protected from real risks.
Kids today face legitimate concerns that didn't exist twenty years ago. They can stumble onto inappropriate content in seconds. They can be contacted by strangers. They can make purchases without understanding the consequences. Apps can drain battery life and attention spans in ways that parents didn't anticipate. The iPad itself is neutral technology, but the context in which a child uses it matters enormously.
Apple understands this, which is why they've built iOS with parental oversight baked in from the ground up. Family Sharing isn't an afterthought. Screen Time isn't optional. Content filtering isn't a third-party hack. These are first-class features that integrate with every major part of the operating system.
The challenge is that the options are extensive. You can control almost anything, which means you have to decide what to control. Do you block all social media, or just limit it? Do you set no screen time limit, or one hour per day? Do you let them download any app from the App Store, or do you review each one first?
There's no universal answer. A five-year-old's iPad setup should look completely different from a fourteen-year-old's. But the principles are the same: think about what your child needs, what they shouldn't access, and what you want visibility into. Then configure the iPad to enforce those boundaries.
According to Common Sense Media research, the average child under age 8 spends about 43 minutes per day on tablets, while children aged 8-12 average about 2 hours and 20 minutes daily. Screen Time limits help keep those numbers in check.
Step 1: Create an Apple ID for Your Child
Every kid using an iPad needs their own Apple ID. This isn't optional if you want to use Family Sharing, and it's the foundation for everything that comes next.
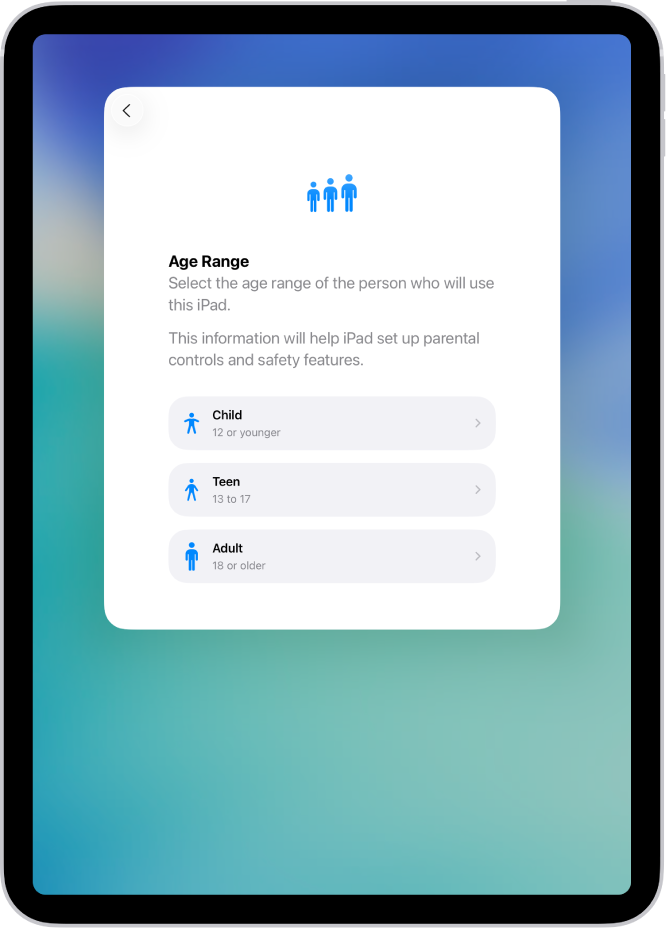
Apple has two paths here, and which one you take depends on your child's age. If your child is under 13, you create the account yourself as the parent. If they're 13 or older, they can create their own account, but you can still add it to Family Sharing for supervision.
Creating an Account for Children Under 13
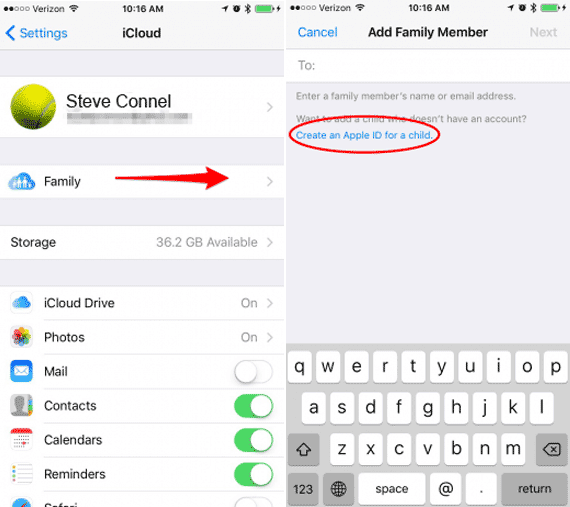
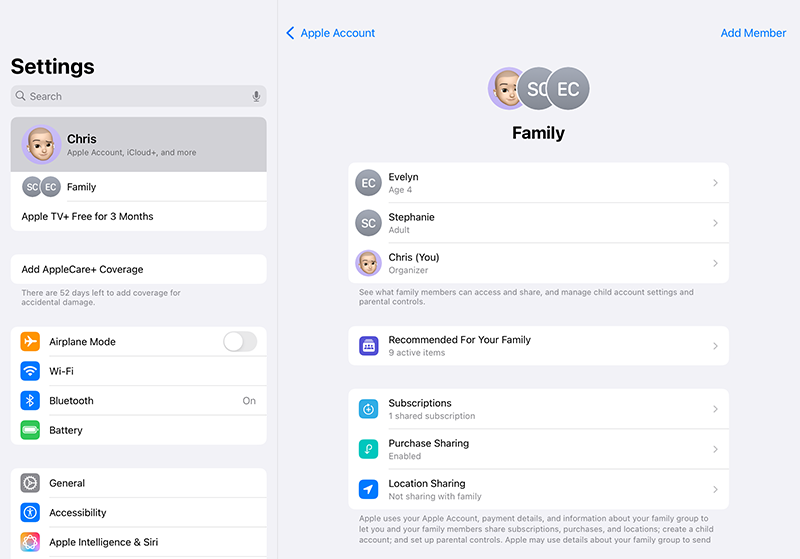
If your child is under 13, open the Settings app on your own iPhone or iPad. Tap your name at the very top of the Settings menu. You should see "Family" listed below your iCloud storage information. Tap it.
You'll see a list of family members (if you've already set up Family Sharing). At the bottom, there's an "Add Member" button. Tap that.
Now you get options: "Create Child Account" or "Invite People." Choose "Create Child Account" because your child doesn't have an existing Apple ID yet.
Apple will walk you through a series of prompts. You'll enter your child's name exactly as it should appear in Apple's system. You'll enter their birth date. Apple uses this to determine content restrictions and age-appropriate recommendations. Then you'll be asked for parental consent. Apple requires you to confirm your own Apple ID password to prove that a real parent is making this decision, not a child pretending to be one.
Once you confirm, the account is created and automatically added to your Family Sharing group. The process takes maybe three minutes. Apple sends a confirmation email to your parent email address. You don't need to click anything. The account is live and ready to use.
Adding an Existing Account to Family Sharing
If your child already has an Apple ID (maybe they created one themselves, or they used someone else's device), you can invite them to join your Family Sharing group instead of creating a new account.
On your own device, go to Settings > [Your Name] > Family. Tap "Add Member." This time, choose "Invite People." You'll be prompted to enter their Apple ID email address. A request gets sent to their email. When they accept the invitation (they'll get an email or notification), they're added to your family group and become subject to the parental controls you set up.
The advantage here is that they keep their existing account and all their apps and data stay intact. The disadvantage is that they have to accept the invitation, which means they know they're being added to parental controls.
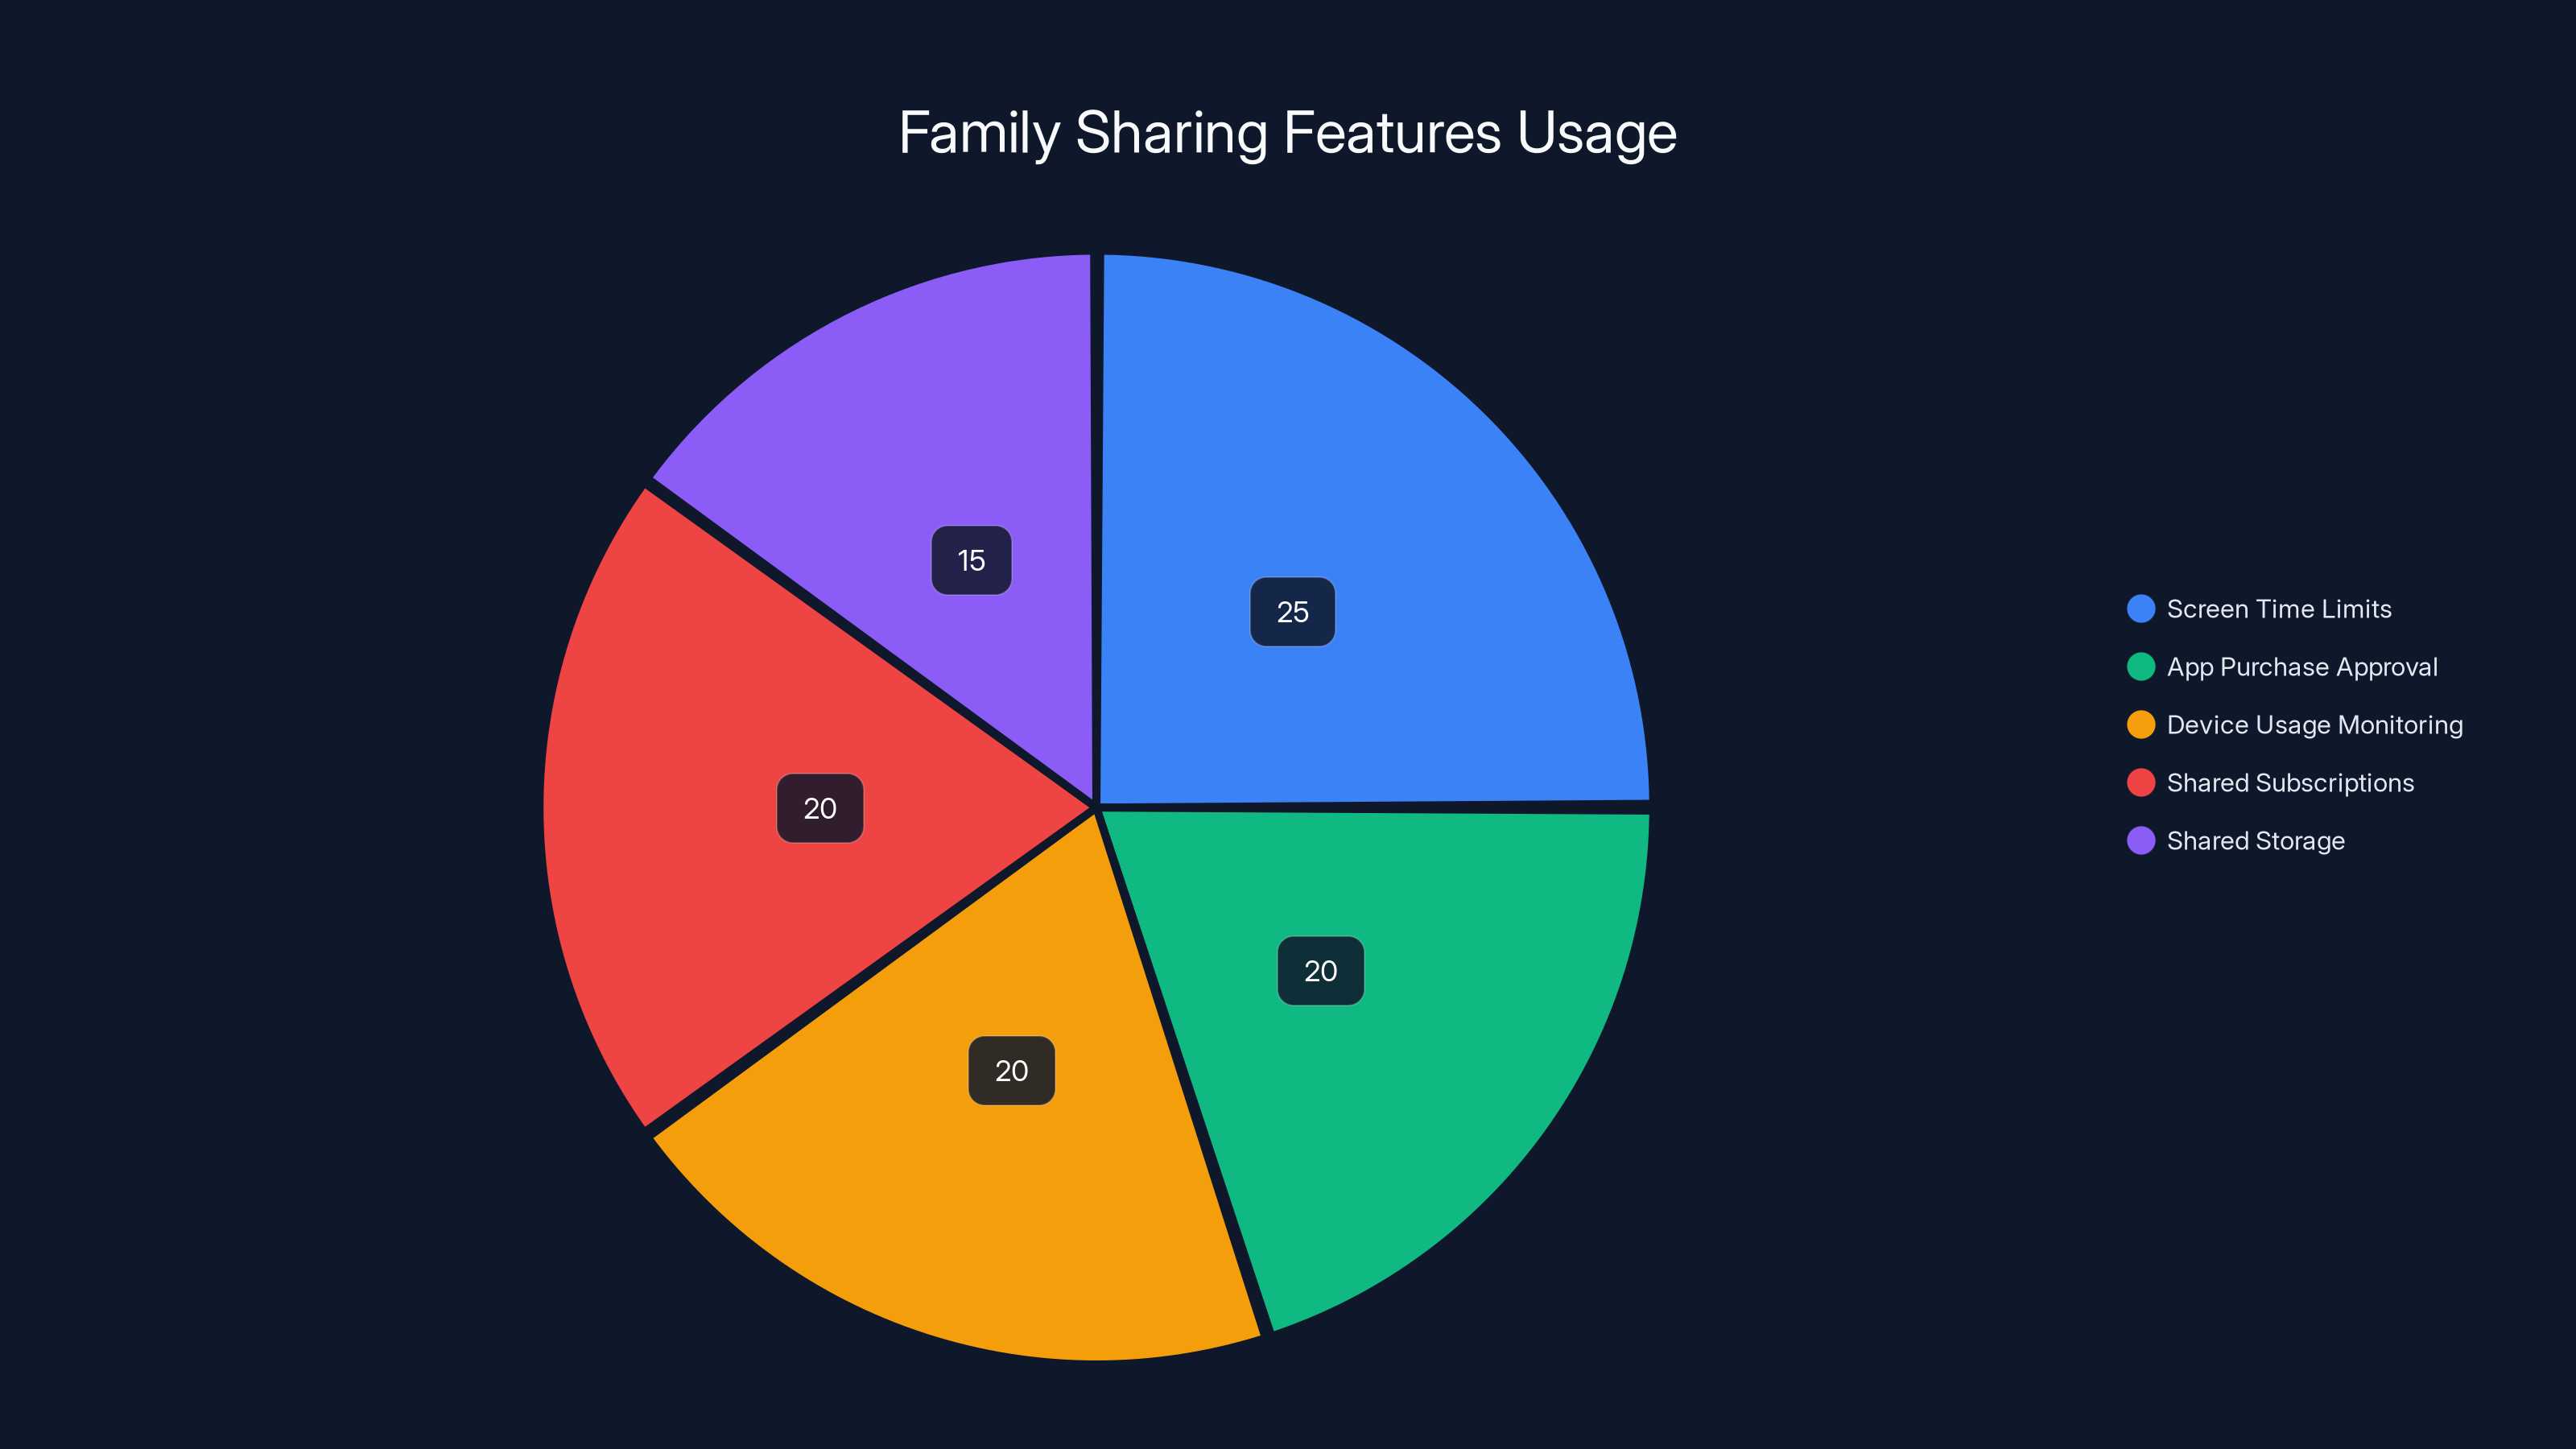
Estimated data shows that Screen Time limits are the most used feature in Family Sharing, followed closely by app purchase approval and device usage monitoring.
Step 2: Enable Family Sharing and Supervision
Family Sharing is Apple's ecosystem for managing multiple devices and accounts in a family unit. It's where all the parental controls live, and it's where you get visibility into your child's device usage.
Understanding Family Sharing
Family Sharing lets up to six people share a family group. More importantly, it creates a hierarchy: the organizer (you) can see and control member devices, approve purchases, share subscriptions, and set up parental restrictions. Family members can see each other's locations (if enabled), share calendars and photos, and use shared iCloud storage.
For child accounts specifically, Family Sharing is the only way to set up parental controls. You can't do it without adding your child's account to a family group.
Setting Up Family Sharing on Your Device
If you haven't set up Family Sharing yet, it takes about two minutes. Go to Settings > [Your Name] > Family. Tap "Family Sharing." If it says "Not Set Up," tap "Get Started." Apple will ask you to review your Apple ID, payment method, and confirm your birthday. This is your parent account, so make sure everything is accurate.
Once confirmed, Family Sharing is active. Your device becomes the organizer. Any child accounts you create from this point are automatically added. Any family members you invite will see a notification asking them to join.
Managing Family Members and Permissions
Go to Settings > [Your Name] > Family > [Child's Name]. You'll see their account details. You can turn off location sharing, allow or disable Ask to Buy (which requires your approval for purchases), and manage their Screen Time and app restrictions from here.
This is the command center for your child's device. Bookmark this location mentally. You'll come back here whenever you need to check what they've been doing, adjust restrictions, or approve a purchase they've requested.
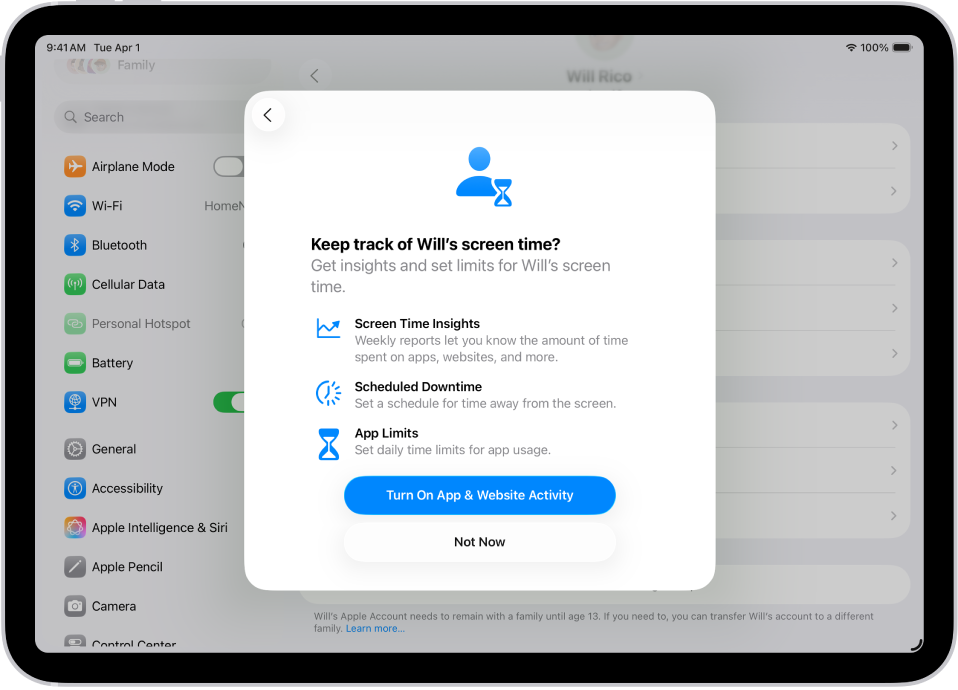
Step 3: Set Up Screen Time and Downtime
Screen Time is the most powerful parental control Apple offers. It gives you the ability to see exactly what your child is doing with their iPad, set time limits, and block access to apps during certain hours.
Configuring Screen Time on the iPad
On your child's iPad, go to Settings > Screen Time. The first time you open this, you'll be asked: "Is this your iPad?" Tap "This is My Child's iPad."
Apple will prompt you to create a Screen Time passcode. This is not the same as the iPad's unlock code. It's a separate four-digit passcode that prevents your child from disabling Screen Time restrictions. Make it something you'll remember but your child can't guess. Write it down. Seriously. If you forget this code, you'll have to erase the iPad and start over.
Once you've set the passcode, you're in the Screen Time settings. You can do all of this on your own device if your child is part of your Family Sharing group, but doing it on their iPad ensures you're not missing any settings.
Understanding Downtime
Downtime is a feature that blocks all apps except the essentials during hours you specify. Think of it as bedtime for the iPad.
Tap "Downtime" and enable it. Set start and end times. You might set downtime from 9 PM to 8 AM if your child is school-age, or from 1 hour before bedtime to 1 hour after waking. During downtime, your child can still make emergency calls and reach contacts you've added to Communication Limits, but they can't use most apps.
When downtime starts, your child gets a notification: "Downtime starts in 5 minutes." They can request more time if they're in the middle of something, but the request goes to you for approval. This is useful because it prevents the "but I was in the middle of a game" argument and teaches them that screen time has natural boundaries.
According to the American Academy of Pediatrics, pediatricians recommend that children aged 6 and older have consistent limits on screen time, with suggestions of no more than 1-2 hours of quality programming per day. Downtime helps enforce these recommendations automatically.
Setting App Limits
App Limits let you set daily time limits for categories of apps. You might allow 30 minutes of Games per day, 45 minutes of Social Networking, and unlimited access to Educational apps.
Tap "App Limits." You can add new limits for each category. When your child reaches their limit for a category, the apps in that category become inaccessible. They get a notification before the timer runs out. Again, they can request more time, which you can approve or deny.
This is more granular than just a total screen time limit. You're not saying "You get two hours of iPad per day," you're saying "Games are limited to 30 minutes, but you can use educational apps as much as you want."
Choose limits based on your child's age and your family's values. A seven-year-old might have 20 minutes of games. A teenager might have 45 minutes. There's no universal rule.
Communication Limits
Communication Limits control who your child can reach out to and who can reach them. Tap "Communication Limits." You have two options: "Contacts Only" or "Favorite Contacts."
"Contacts Only" means your child can call or text any contact in their address book. "Favorite Contacts" means they can only reach people you've added to their Favorites list (usually family members and very close friends).
You can set different limits for during the day and during downtime. You might allow them to reach anyone during school hours, but only family during downtime.
Always Allowed
The "Always Allowed" section is where you list apps that remain accessible even when the app limit for that category is reached. This is where you'd add Messages, Phone, Contacts, and any educational apps you want them to have unlimited access to.
You can also set which contacts are always accessible in the Contacts app, so your child can always reach you, a trusted adult, or emergency services.
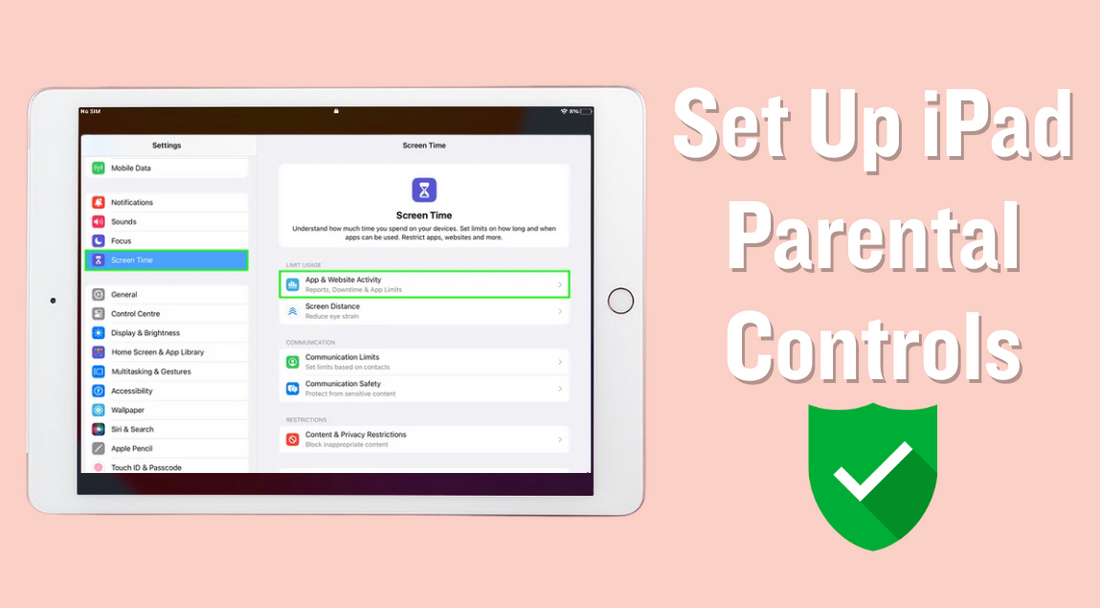
Step 4: Enable Content and Privacy Restrictions
Content and Privacy Restrictions are where you control what content your child can access and what permissions apps have on the device. This is as important as Screen Time, but it's easier to overlook because there's no visual timer or notification.
Turning On Restrictions
Go to Settings > Screen Time > Content & Privacy Restrictions. Toggle it on. You'll be asked for your Screen Time passcode to confirm.
Once enabled, you'll see several sections. Each one controls a different aspect of what your child can do with the iPad.
App Store Restrictions
Under "iTunes & App Store Purchases," you can control app downloads and in-app purchases. You have these options:
Allow: The child can download any free app and make purchases without your approval.
Don't Allow: Your child cannot download or purchase anything.
Ask: Your child can request apps, but the request goes to you for approval. You get a notification and can approve or deny it.
For most parents, "Ask" is the right choice. It prevents surprise app downloads and accidental purchases, but it doesn't completely lock down the device. You can approve educational apps quickly, and you can deny games that seem inappropriate.
You also set age ratings. Apps are rated 4+, 12+, 17+, and 18+. You can choose which ratings your child can access. For a young child, set this to 4+ or 12+. For a teenager, maybe 12+ or 17+. The 18+ category is for adult content and should be blocked for any child.
Content Restrictions
Scroll down and you'll see sections for Books, Music, Movies, TV Shows, and Apps. Each one lets you set a maximum rating.
For Music, you can filter explicit content. For Movies and TV Shows, you can set a maximum rating. For example, you might allow G and PG movies, but block PG-13 and above. For Apps, you can choose minimum age requirements.
These ratings are standardized across the App Store and all Apple services, so the restrictions apply everywhere your child uses their Apple ID.
Web Content Restrictions
This is one of the most important sections. Go to Settings > Screen Time > Content & Privacy Restrictions > Web Content. You have these options:
Unrestricted: Your child can access any website.
Limit Adult Websites: Safari will try to block adult content using machine learning. It's not perfect, but it catches a lot.
Allowed Websites Only: Your child can only visit websites you've explicitly added to a whitelist.
For younger children, use "Allowed Websites Only" and add education sites like Khan Academy, PBS Kids, and their school's website. For older children, use "Limit Adult Websites." It blocks most inappropriate content while still allowing access to the broader internet.
You can also set a list of websites that are always blocked, regardless of the mode you choose. This is useful if you discover a site you don't want your child accessing.
Privacy Controls
Scroll down further and you'll see permissions for Location Services, Contacts, Calendars, Photos, Bluetooth Sharing, Wi-Fi, and more. For each permission, you can allow or deny changes.
For example, you can turn off Location Services entirely, or allow it but prevent your child from toggling it off. You can prevent changes to Bluetooth, which protects against pairing with devices you don't know about. You can restrict Photo access if you want to control what photos your child can see and edit.
Be thoughtful here. You don't want to lock down every single permission, or the iPad becomes barely usable. Instead, focus on the permissions that matter for your family's safety and values.
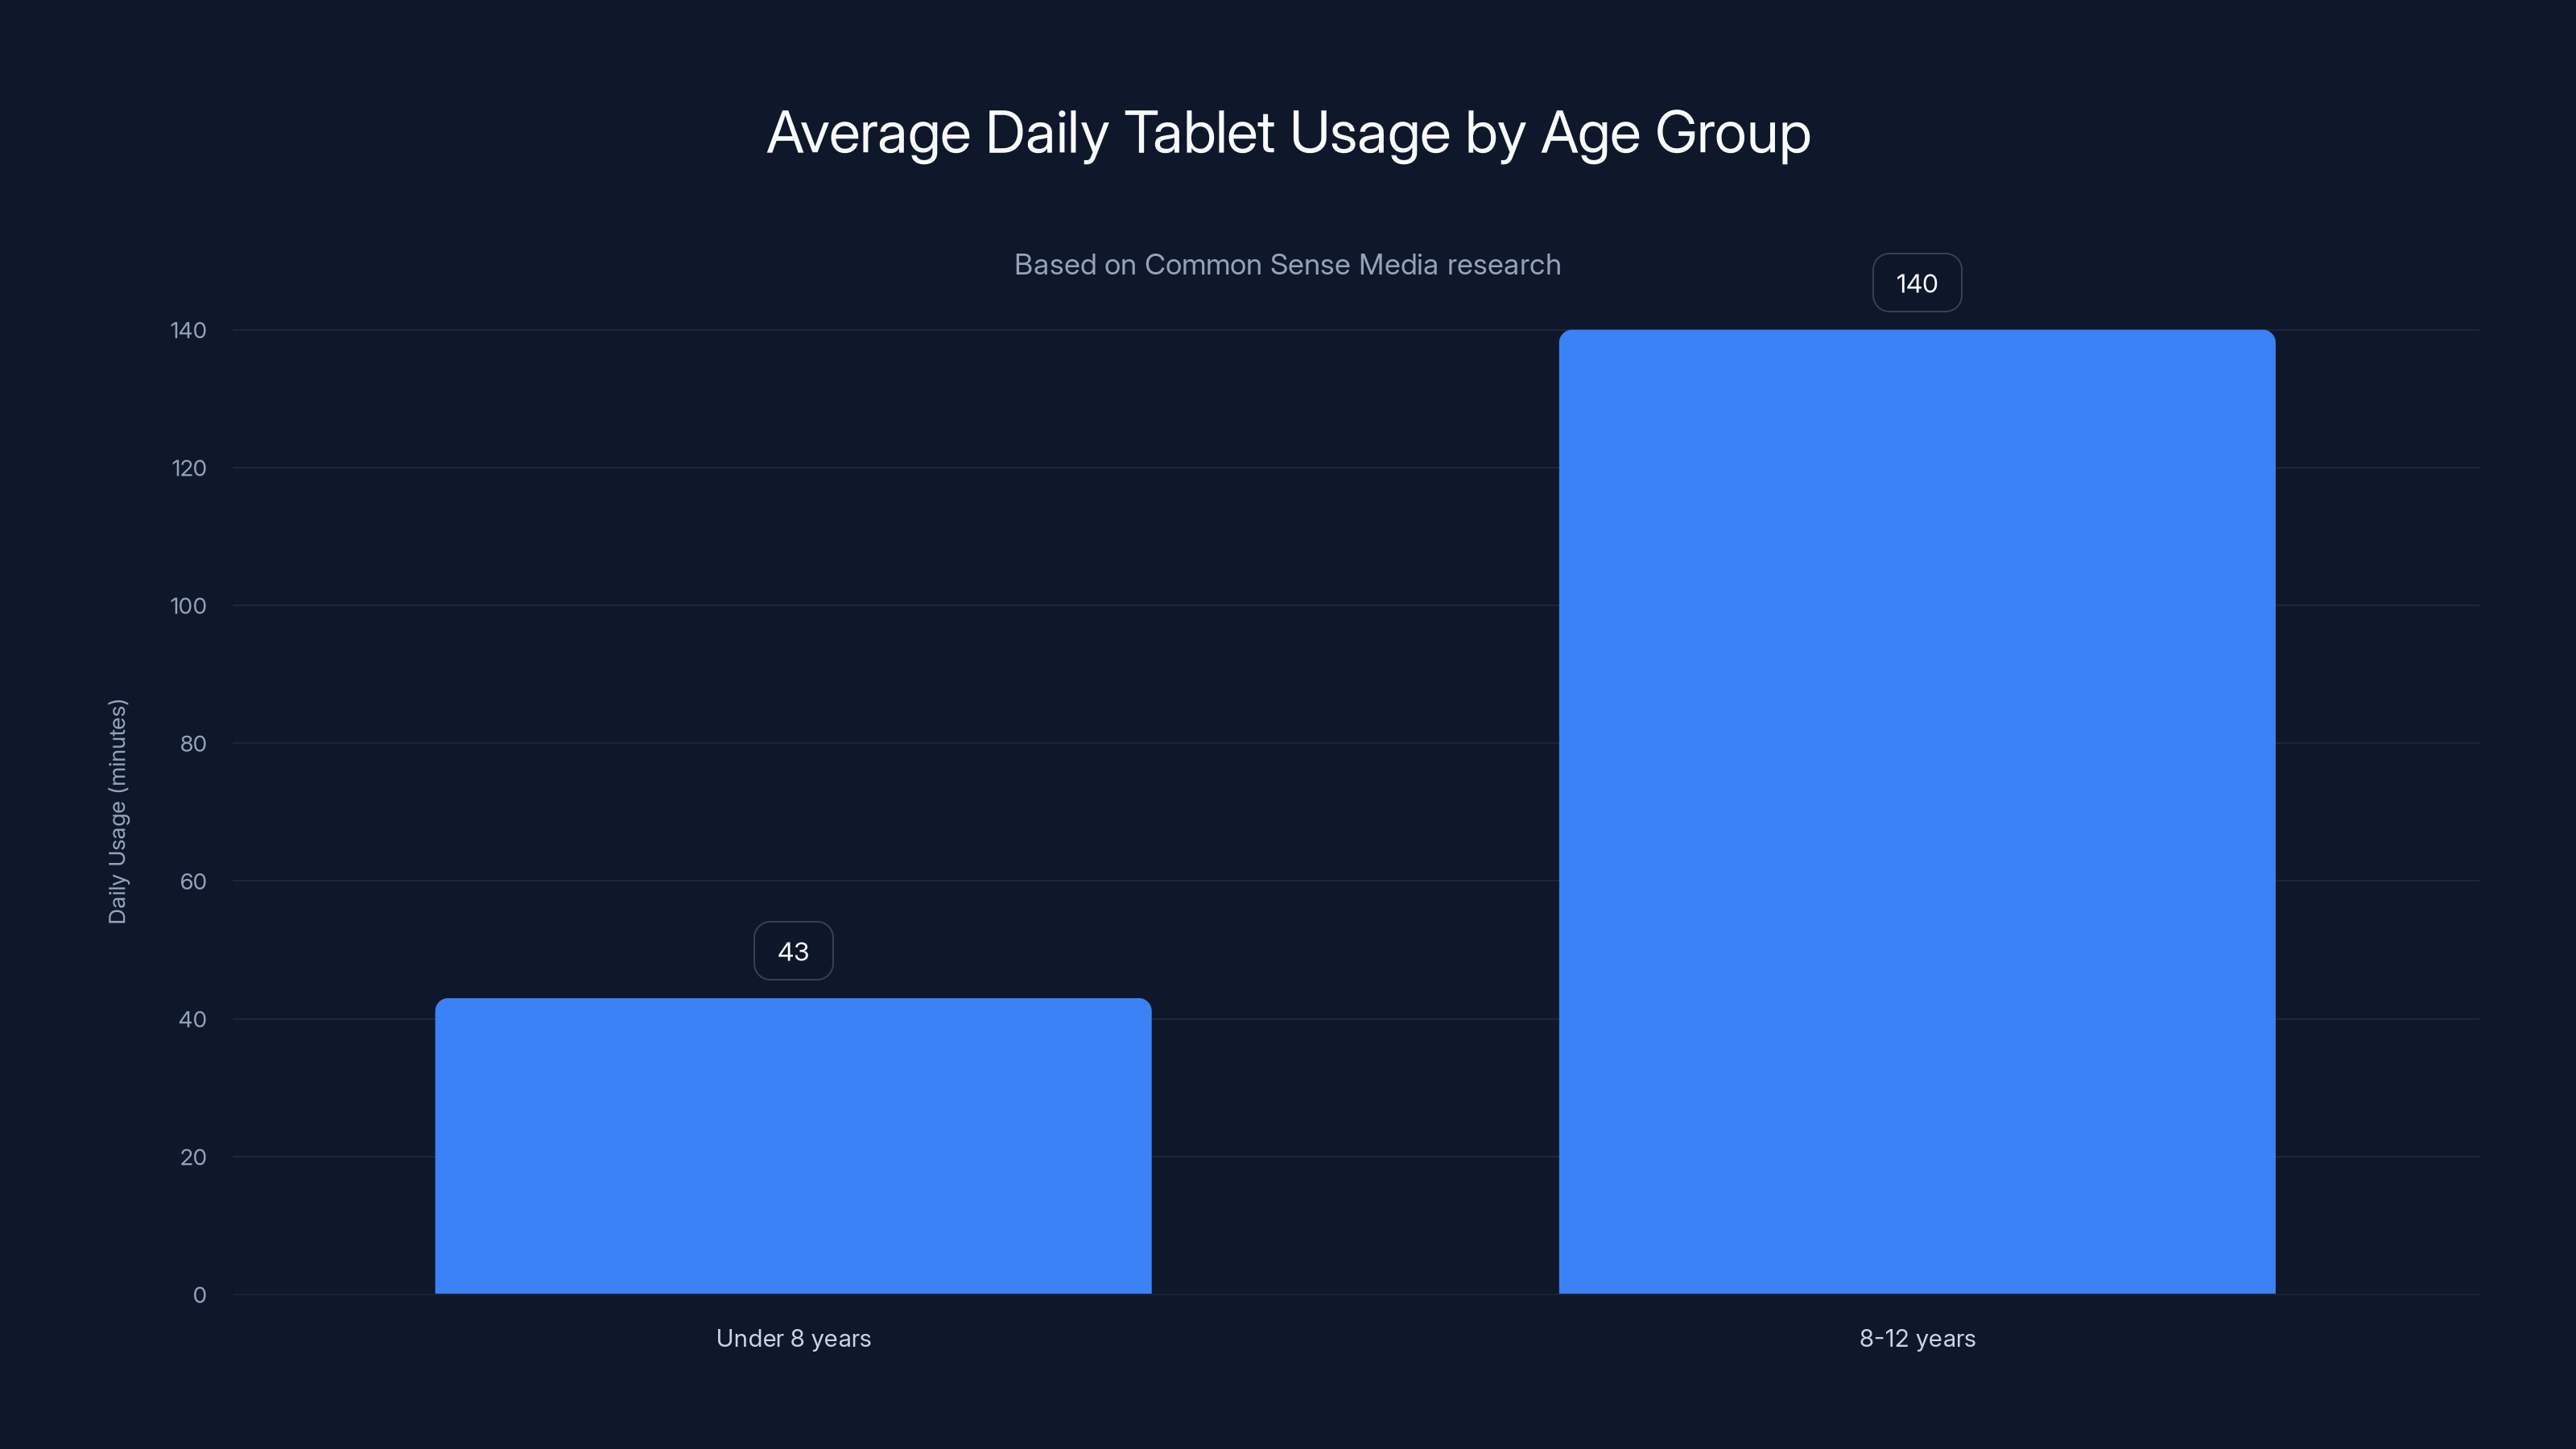
Children under 8 spend an average of 43 minutes daily on tablets, while those aged 8-12 average 2 hours and 20 minutes. Screen Time limits can help manage these durations.
Step 5: Configure Safari and Web Safety
Safari is the gateway to the internet on your child's iPad. Unlike apps, which have some moderation through the App Store, Safari has unlimited access to any website in the world. You need to protect against both accidental discovery of inappropriate content and intentional searching for things your child shouldn't see.
Enable Safe Search
Safari has a Safe Search feature that filters explicit results from Google, Bing, Yahoo, and DuckDuckGo. It's built in and automatic.
Go to Settings > Safari. Scroll down and make sure "Fraudulent Website Warning" is enabled. This protects against phishing scams and malicious sites. Then look for search engine settings. Make sure Safe Search is enabled.
Safe Search isn't foolproof, but it blocks most of the worst stuff. Combined with Content & Privacy Restrictions, it creates a multi-layered defense.
Control App Permissions
Even before your child opens an app, you can control what permissions it has. Go to Settings and search for "App Permissions." Apple groups permissions by type: Camera, Microphone, Photos, Location, Contacts, Calendar, and more.
For example, you can allow the Camera app to use the camera, but deny permission to a random game that has no business accessing the camera. This prevents apps from using device capabilities in ways you don't intend.
The catch is that you need to know which apps are requesting which permissions. The first time your child opens an app that wants permission, they'll get a prompt asking if the app can access a certain feature. Review these prompts. Deny permissions that don't make sense.
Restrict AirDrop
AirDrop is Apple's file-sharing feature. Anyone nearby with an Apple device can send files to your child's iPad. This could be a neighbor, a stranger at the coffee shop, or someone at school.
Go to Settings > General > AirDrop. You have three options: Receiving Off, Contacts Only, or Everyone.
For a young child, set it to Receiving Off. They can't receive files from anyone. For an older child, set it to Contacts Only so only people in their address book can send them files.
Step 6: Enable Communication Safety and Image Detection
Apple added a feature called Communication Safety that uses on-device machine learning to detect images that contain nudity. When your child receives or attempts to view such an image, the iPad blurs it and offers guidance.
This is a real protection against a very real problem. Predators and even well-meaning peers sometimes share explicit images with children. Communication Safety catches a lot of this before your child sees it.
Turning On Communication Safety
Go to Settings > Screen Time > Communication Safety. Toggle it on. You'll see options for Messages, FaceTime, and Mail.
When Communication Safety is enabled and detects a sensitive image:
- The image is blurred in the conversation.
- The child is shown an age-appropriate warning explaining that they're about to view sensitive content.
- The child is given the option to delete the message or view it anyway.
- If the child is very young (under 12), you get a notification so you can follow up.
This happens entirely on the device. Apple's servers never see the image. The detection happens locally, which means privacy is preserved while safety is maintained.
How It Works in Practice
Let's say your child is messaging a friend who sends an inappropriate image. Communication Safety detects it, blurs the image in the chat, and shows a warning: "This image may contain sensitive content." Your child sees the warning before seeing the image. If they're confused about why it's there, they can ask you.
If your child is under 12 and attempts to view the image anyway, you get a notification. You can then talk to your child about what happened and why you've set up these protections.
For older children, the system trusts their judgment more. They see the warning and can decide how to handle it, but you're not immediately notified unless they report it or delete it.
Step 7: Manage Location Sharing and Family Visibility
Location sharing is a double-edged sword. It can be a valuable safety tool, letting you know where your child is. But it's also a privacy concern, especially for older kids.
Setting Up Location Sharing
Go to Settings > [Your Name] > Family > [Child's Name] > Location. You'll see a toggle for Location Sharing. Turn it on. Open the Find My app on your own device. You should see your child's iPad appear on the map.
Now you can see, in real-time, where your child is. This is genuinely useful. If your middle schooler says they're at a friend's house, you can verify that. If they don't come home from school at the expected time, you can find them.
The downside is that it can feel invasive to older kids, especially teenagers. Some argue it's a violation of privacy. Others say it's essential for safety. There's no right answer. It depends on your family's values, your child's age, and your comfort level.
Finding a Device
If your child loses their iPad, you can find it using the Find My app. You can see its location on a map, play a sound to help locate it, lock it remotely, or erase it if it's been stolen.
This is a practical benefit of location sharing that often gets overlooked. Devices get lost. Having the ability to find them is genuinely valuable.

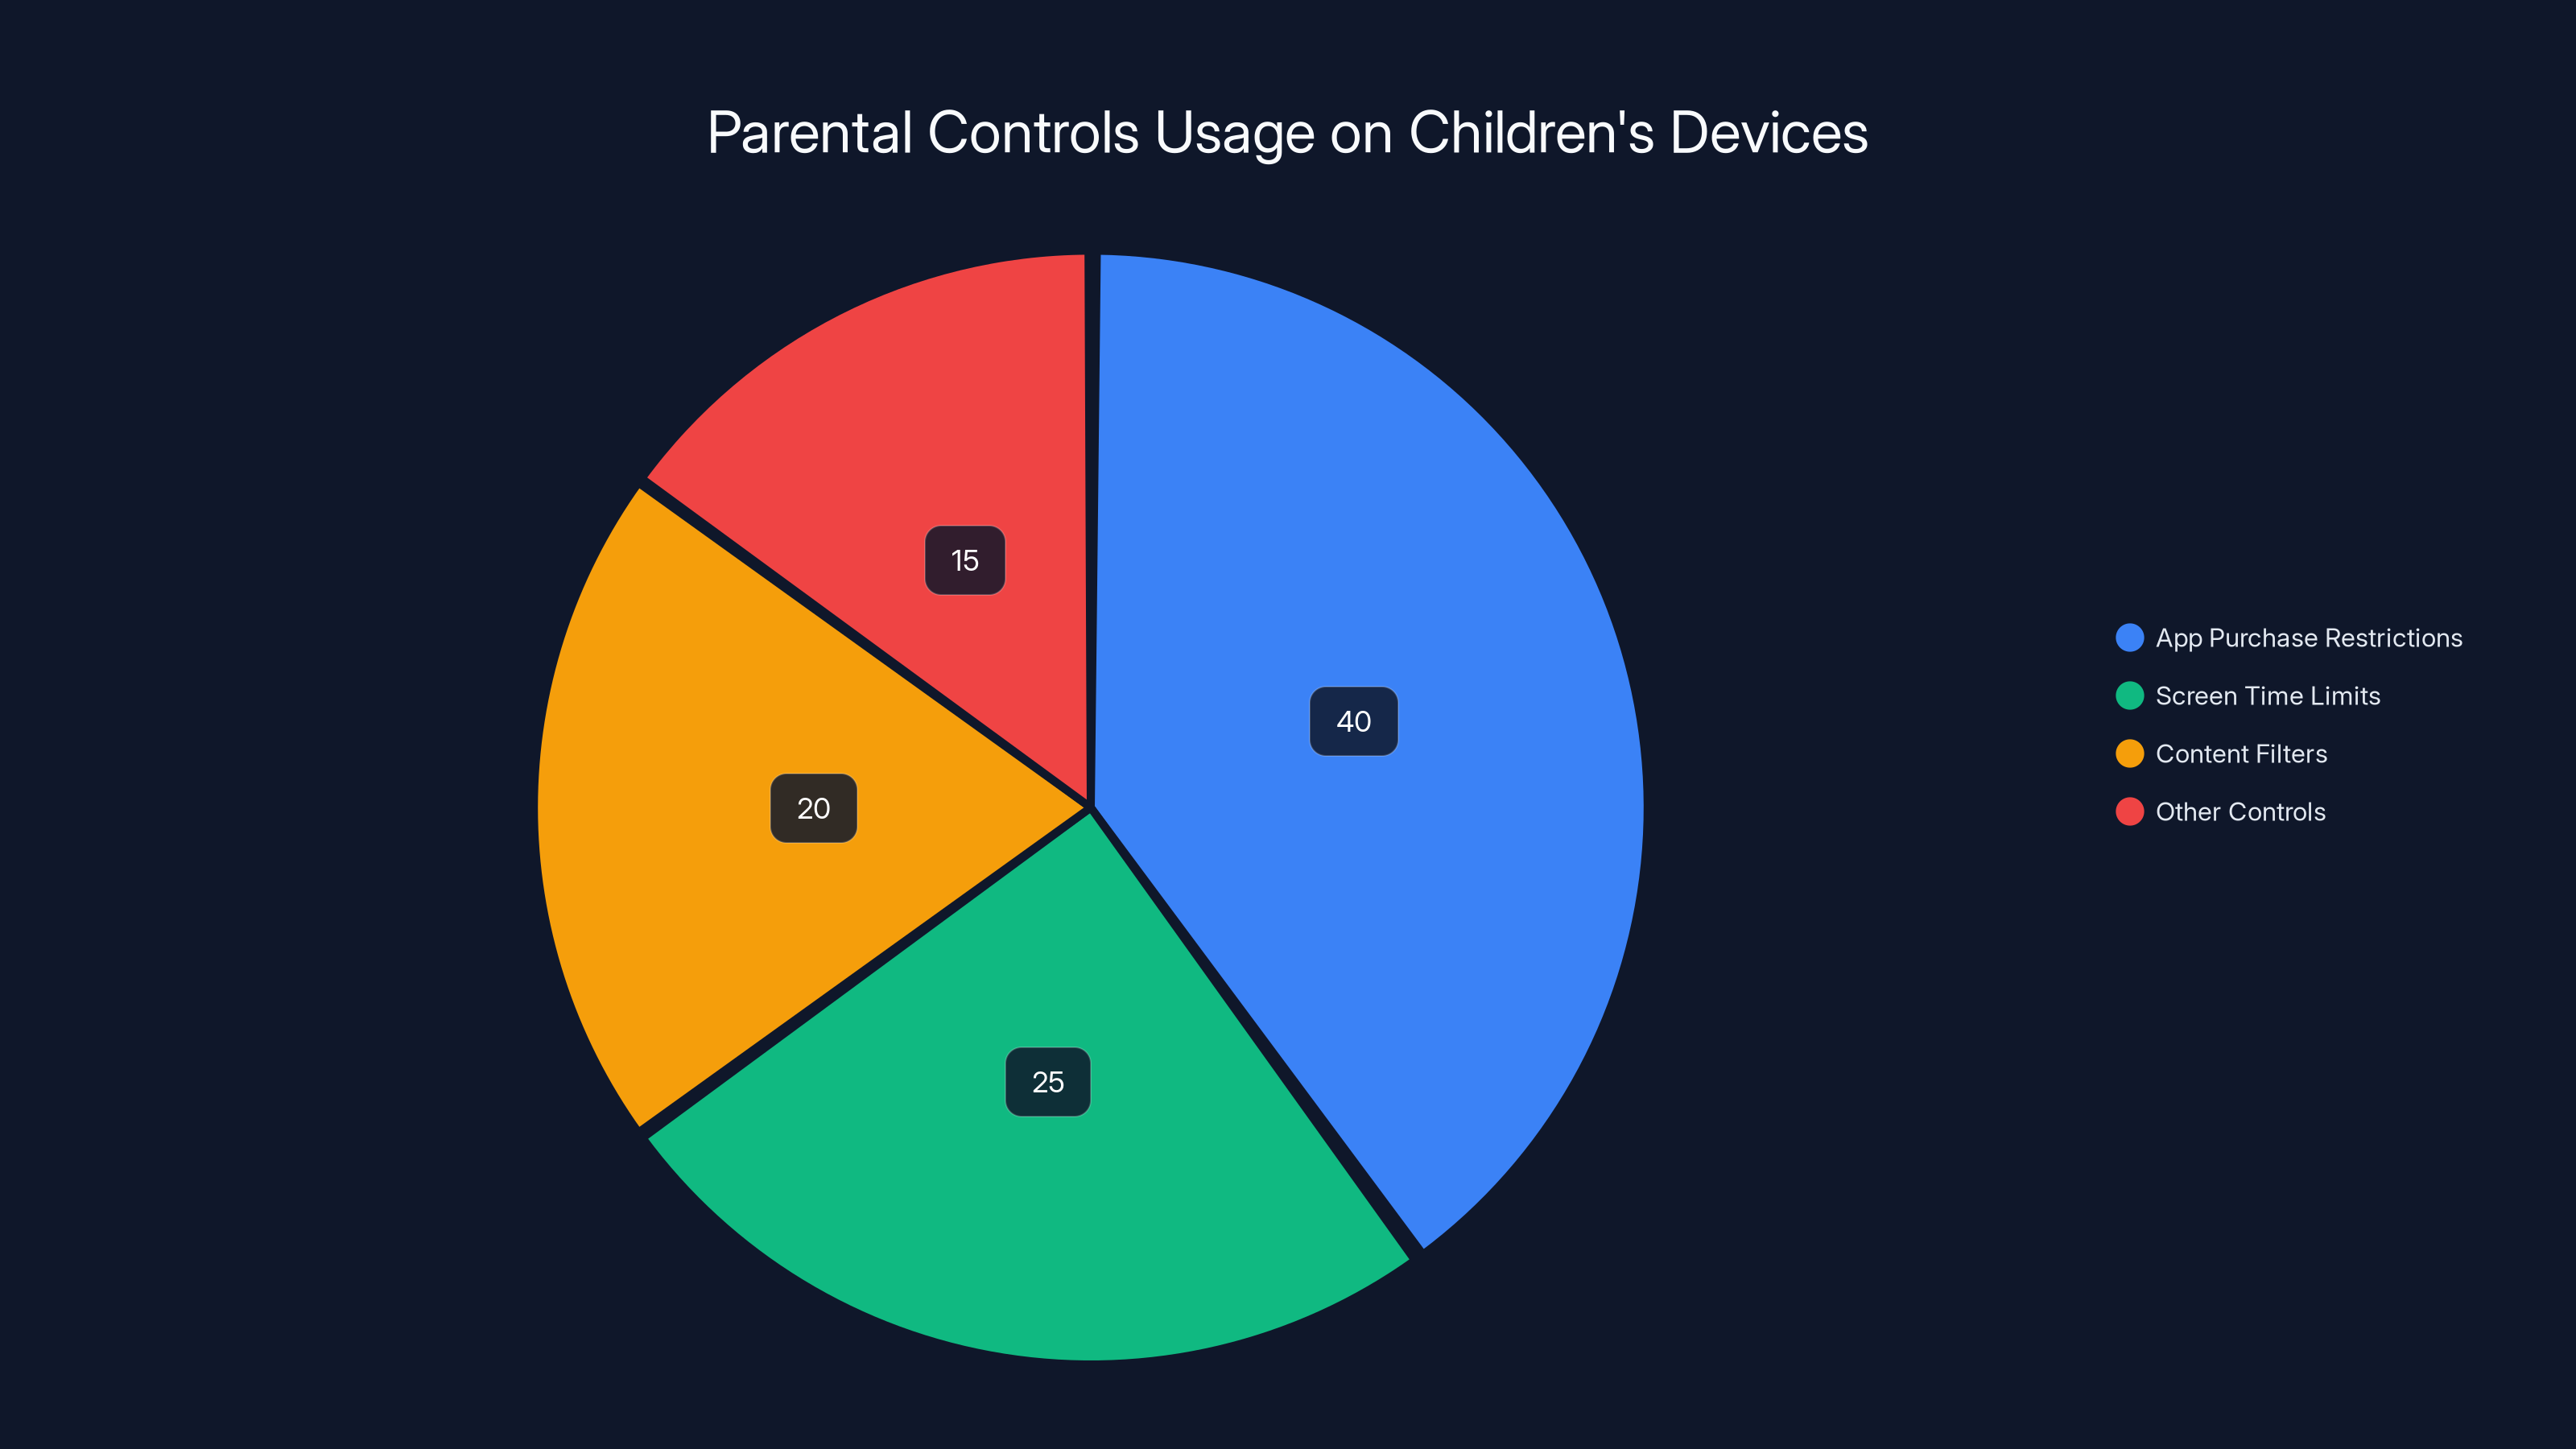
Estimated data shows app purchase restrictions are the most common parental control, used by 40% of parents. Estimated data.
Step 8: Set Up Ask to Buy and Approve Purchases
Ask to Buy is a feature that requires your approval for any app purchase or in-app purchase your child tries to make. This prevents surprise charges and teaches your child that spending money requires permission.
Enabling Ask to Buy
Go to Settings > [Your Name] > Family > [Child's Name] > Purchases. Toggle on "Ask to Buy."
Now, whenever your child tries to buy an app or make an in-app purchase, instead of the purchase going through, a request gets sent to you. You'll see a notification: "[Child's Name] would like to buy [App Name]."
You can approve or deny the request. You can also set a daily or weekly limit if you want to be hands-off about smaller purchases but require approval for expensive ones.
Reviewing App Requests
Your child might request an app you've never heard of. Before approving, spend 30 seconds researching it. Open the App Store, search for the app, and read reviews. Is it age-appropriate? Are parents complaining about hidden costs or ads? Is it educational or is it just a time sink?
You don't need to be paranoid or overprotective, but asking "Is this app actually good for my child?" is a reasonable question before approving the download.
According to a study by the Pew Research Center, 73% of parents use parental controls on their children's devices, with app purchase restrictions being the most common control enabled. Ask to Buy is one of the most popular parental features for this reason.
Step 9: Monitor Screen Time Reports and Usage Patterns
Screen Time isn't just for setting limits. It's also a reporting tool. You can see exactly what your child is doing with their iPad: which apps they're using, how much time they're spending on each, and when they're most active.
Accessing Screen Time Reports
Go to Settings > Screen Time. You'll see a breakdown of today's usage by category and app. Swipe down to see more detail. You can also tap "See All Apps & Websites" to see every single app your child opened today, how many times it was opened, and how long they spent in each.
Tap "Weekly" to see trends over a week. This is where patterns emerge. You might notice your child is spending an hour per day in a social media app, or that they're mostly using educational apps on weekdays but gaming all weekend.
Setting Trends and Limits
These reports help you fine-tune your restrictions. If your child is consistently hitting their app limit for Games before the day ends, they clearly want more time. You can either increase the limit or have a conversation about why it's set where it is.
If you notice your child is using an app you didn't know about, you can research it and decide whether to allow it, limit it, or block it entirely.
Screen Time reports are less about surveillance and more about understanding your child's digital habits. Use them to inform conversations, not to spy.
Step 10: Manage Siri and Voice Controls
Siri is Apple's voice assistant. It's incredibly useful, but it can also bypass parental controls if you're not careful. For example, Siri can place phone calls, send messages, and open apps without the unlock code.
Disabling Siri on the Lock Screen
Go to Settings > Siri & Search. Toggle off "Allow Siri When Locked." Now your child needs to unlock the iPad with Face ID or Touch ID before they can use Siri.
This doesn't completely prevent Siri usage, but it adds a layer of protection. Combined with your parental controls, it reduces the likelihood that your child can circumvent restrictions.
What Siri Can and Can't Do
Even without the lock screen restriction, Siri is still subject to parental controls. If you've set Communication Limits, Siri can't call or message people outside those limits. If you've restricted app access, Siri can't open those apps.
But you should still disable Siri on the lock screen just to be safe. It's one more barrier.
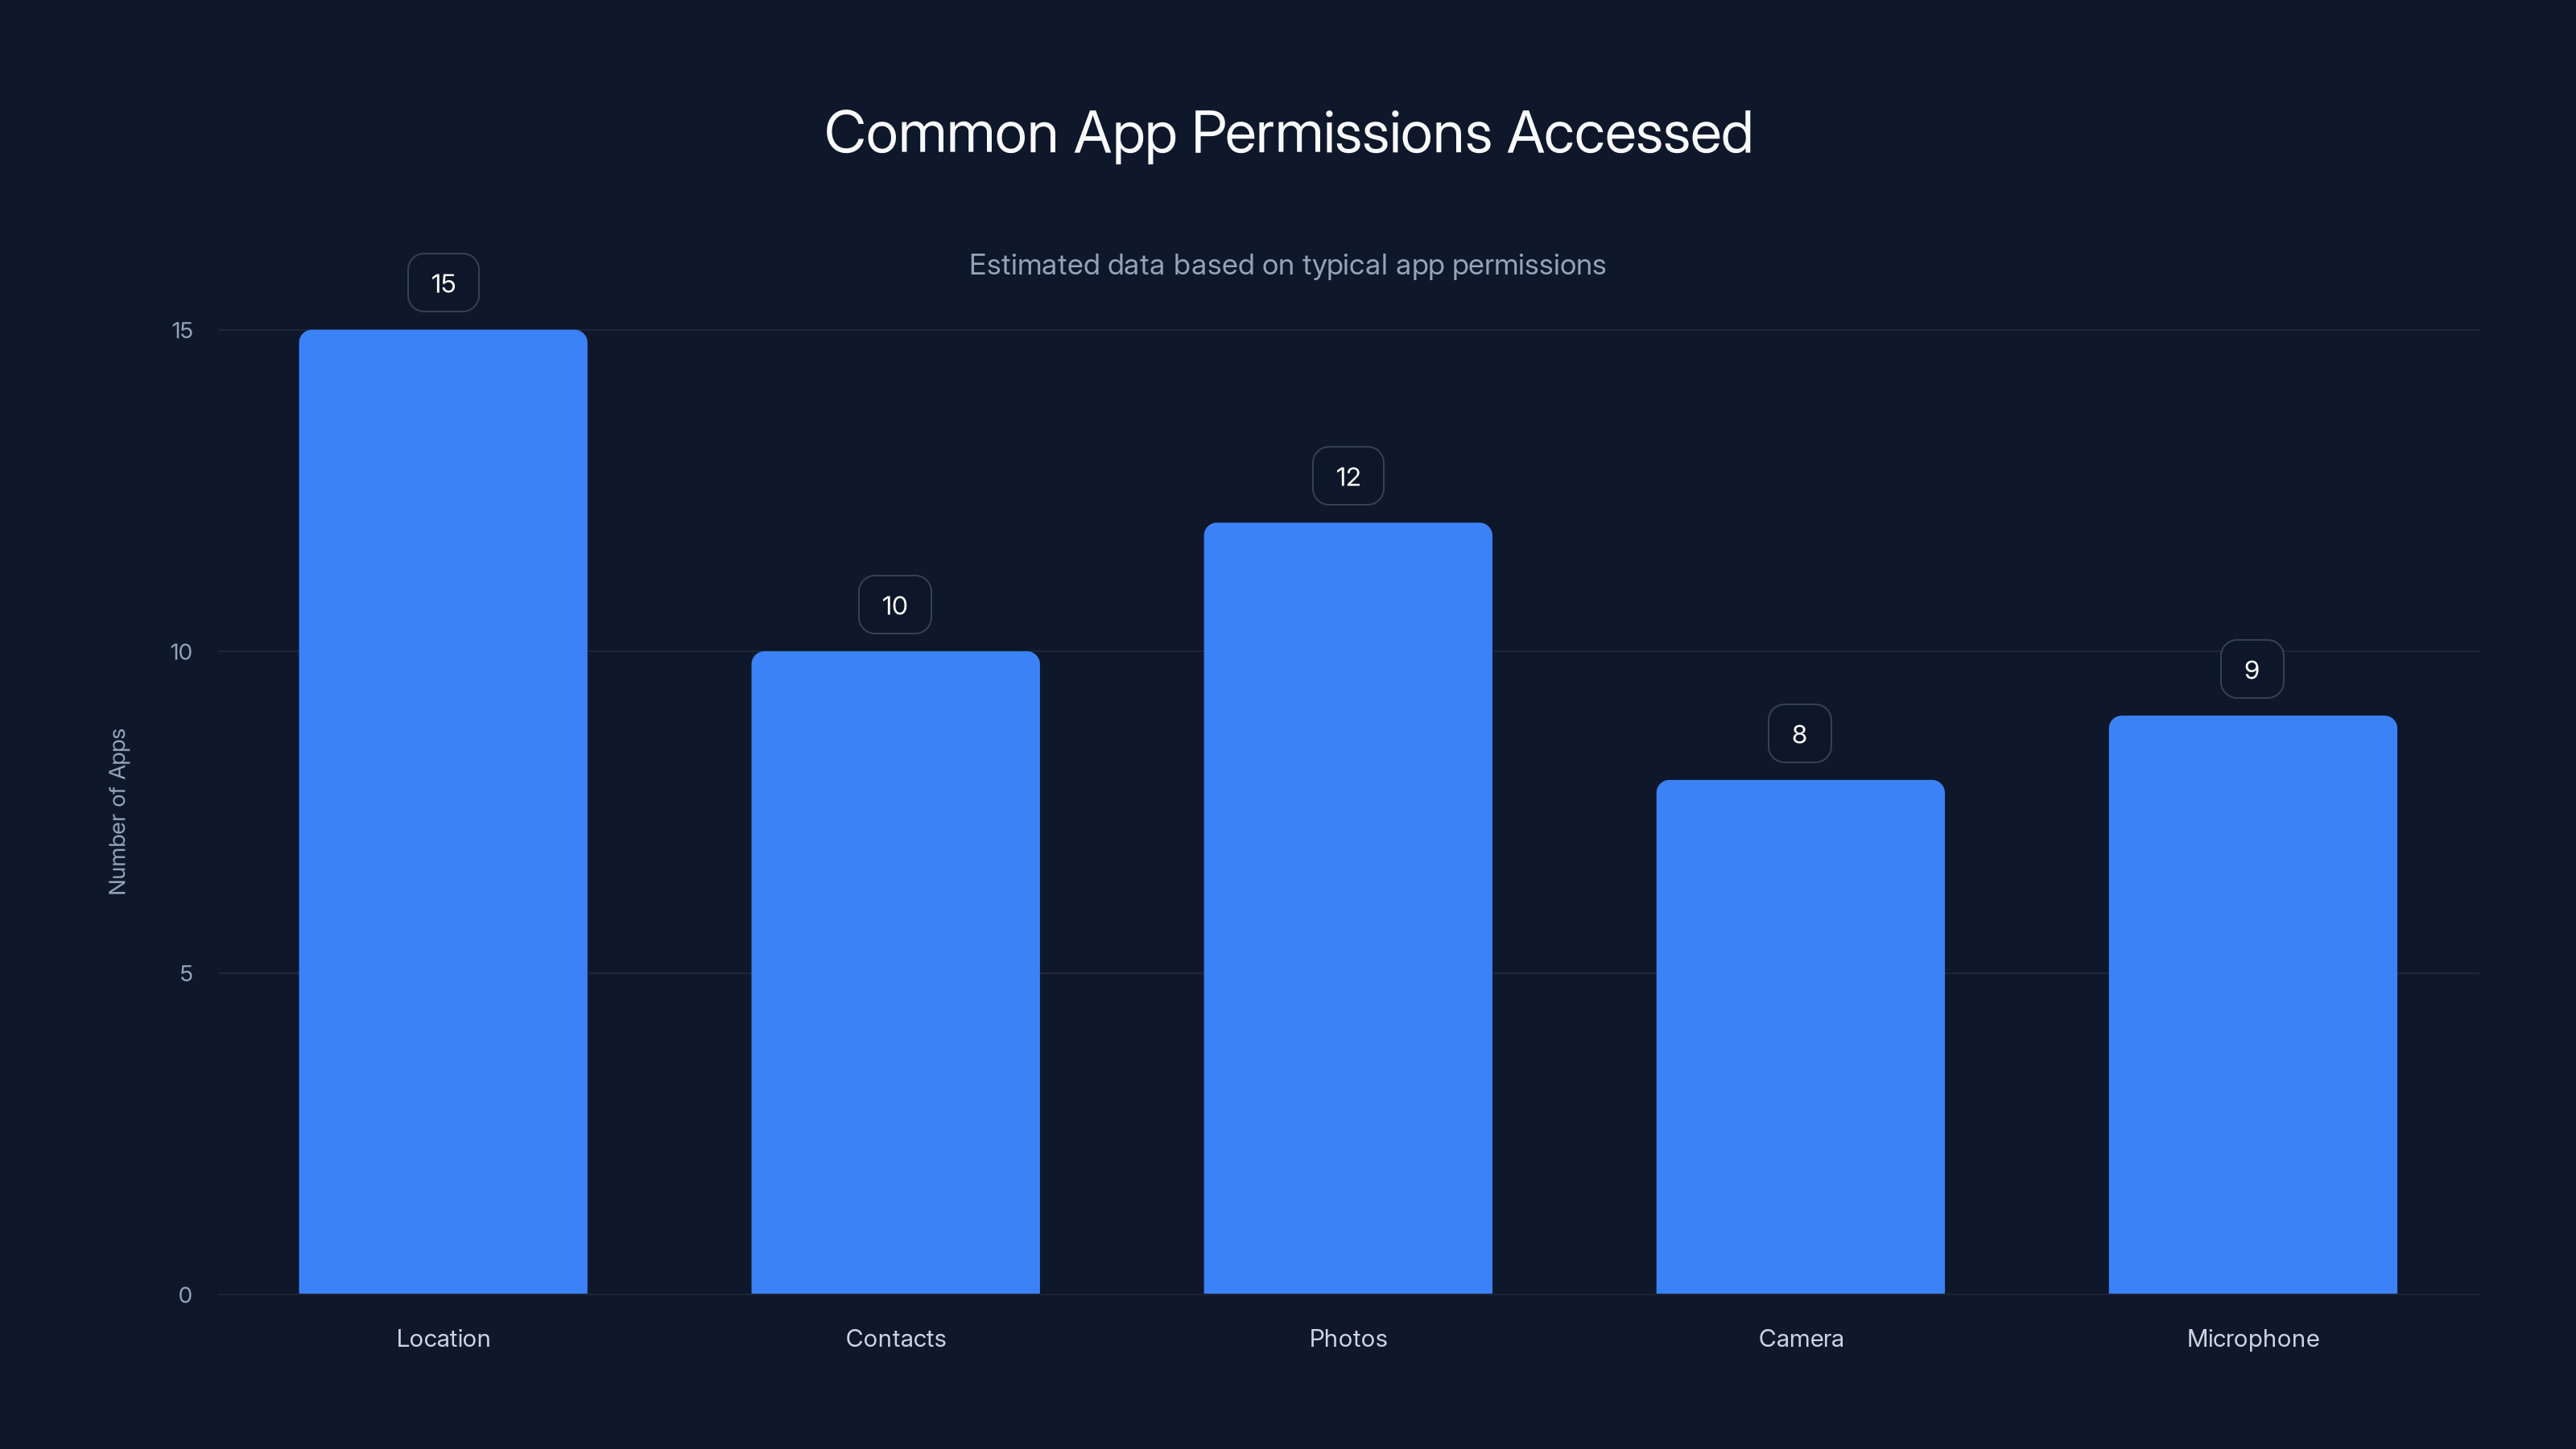
Estimated data shows that location and contacts are the most accessed permissions by apps. It's crucial to regularly review app permissions to ensure privacy.
Step 11: Protect Against Unauthorized Account Changes
Apple IDs can be changed or passwords can be reset. You don't want your child changing their own account details or resetting the password without your knowledge.
Restricting Account Changes
Go to Settings > Screen Time > Content & Privacy Restrictions > Accounts.
You have two options: Allow Changes or Don't Allow Changes. Choose "Don't Allow Changes."
Now your child can't change their Apple ID password, add a new Apple ID to the device, or modify iCloud settings. If they forget their password or want to add a new account, they need to ask you first.
Managing Passcode Changes
Go to Settings > Face ID & Passcode (or Touch ID & Passcode on older iPads). Your child can't change the device passcode if parental controls are set up correctly, but you should verify this by looking at the Screen Time settings.
Go to Settings > Screen Time > Content & Privacy Restrictions > System Services. Make sure that changes to "Face ID & Passcode" or "Touch ID & Passcode" are restricted.

Step 12: Handle Gaming and Entertainment Restrictions
Gaming is where most parents need to draw a line. Games are designed to be addictive. They include in-app purchases, ads, and social features that can expose your child to inappropriate content or strangers.
Setting Game Time Limits
We covered this under App Limits, but it's important enough to emphasize. Games are probably the app category your child will hit their time limit on first. That's intentional.
Start with a limit that feels reasonable to you. For a young child, maybe 20-30 minutes per day. For a teenager, maybe 45 minutes to an hour. Your child will ask for more, and sometimes you'll grant it. That's fine. You're not being mean. You're teaching balance.
Blocking In-App Purchases
Many games are technically free but make money through in-app purchases. A cosmetic skin costs
Go to Settings > Screen Time > Content & Privacy Restrictions > iTunes & App Store Purchases. Set "In-App Purchases" to "Don't Allow."
Now your child can play free games, but they can't spend money within those games. If they want to make a purchase, they need to ask you.
Age-Appropriate Game Selection
The App Store rates games by age: 4+, 12+, 17+, and 18+. Look at these ratings before approving games. A game rated 17+ probably has violence, strong language, or other content you don't want your child to see.
But don't rely solely on ratings. Read reviews from parents. See what other kids are saying. Ask your child's friends what they're playing. Sometimes a 12+ game is fine for your 10-year-old because it's educational. Sometimes a 4+ game is boring and leads to arguments about time limits.
Step 13: Set Up iCloud Backup and Account Recovery
Backups are often overlooked in parental setup guides, but they're crucial. If something goes wrong with your child's iPad, you can restore from backup and all their data comes back.
Enabling iCloud Backup
Go to Settings > [Child's Name] > iCloud > iCloud Backup. Toggle it on. The iPad will back up to Apple's servers when it's plugged in, connected to Wi-Fi, and locked.
This happens automatically. You don't need to do anything else. But it's good to know that if the iPad is lost, stolen, or damaged, you can restore your child's photos, apps, and data on a new iPad.
Setting Recovery Options
Go to Settings > [Child's Name] > Password & Security > Recovery. You can add a trusted phone number or email that can be used to recover the account if your child forgets their password.
This is important because if your child loses access to their account and you can't help them recover it, they lose everything. Recovery options prevent that scenario.
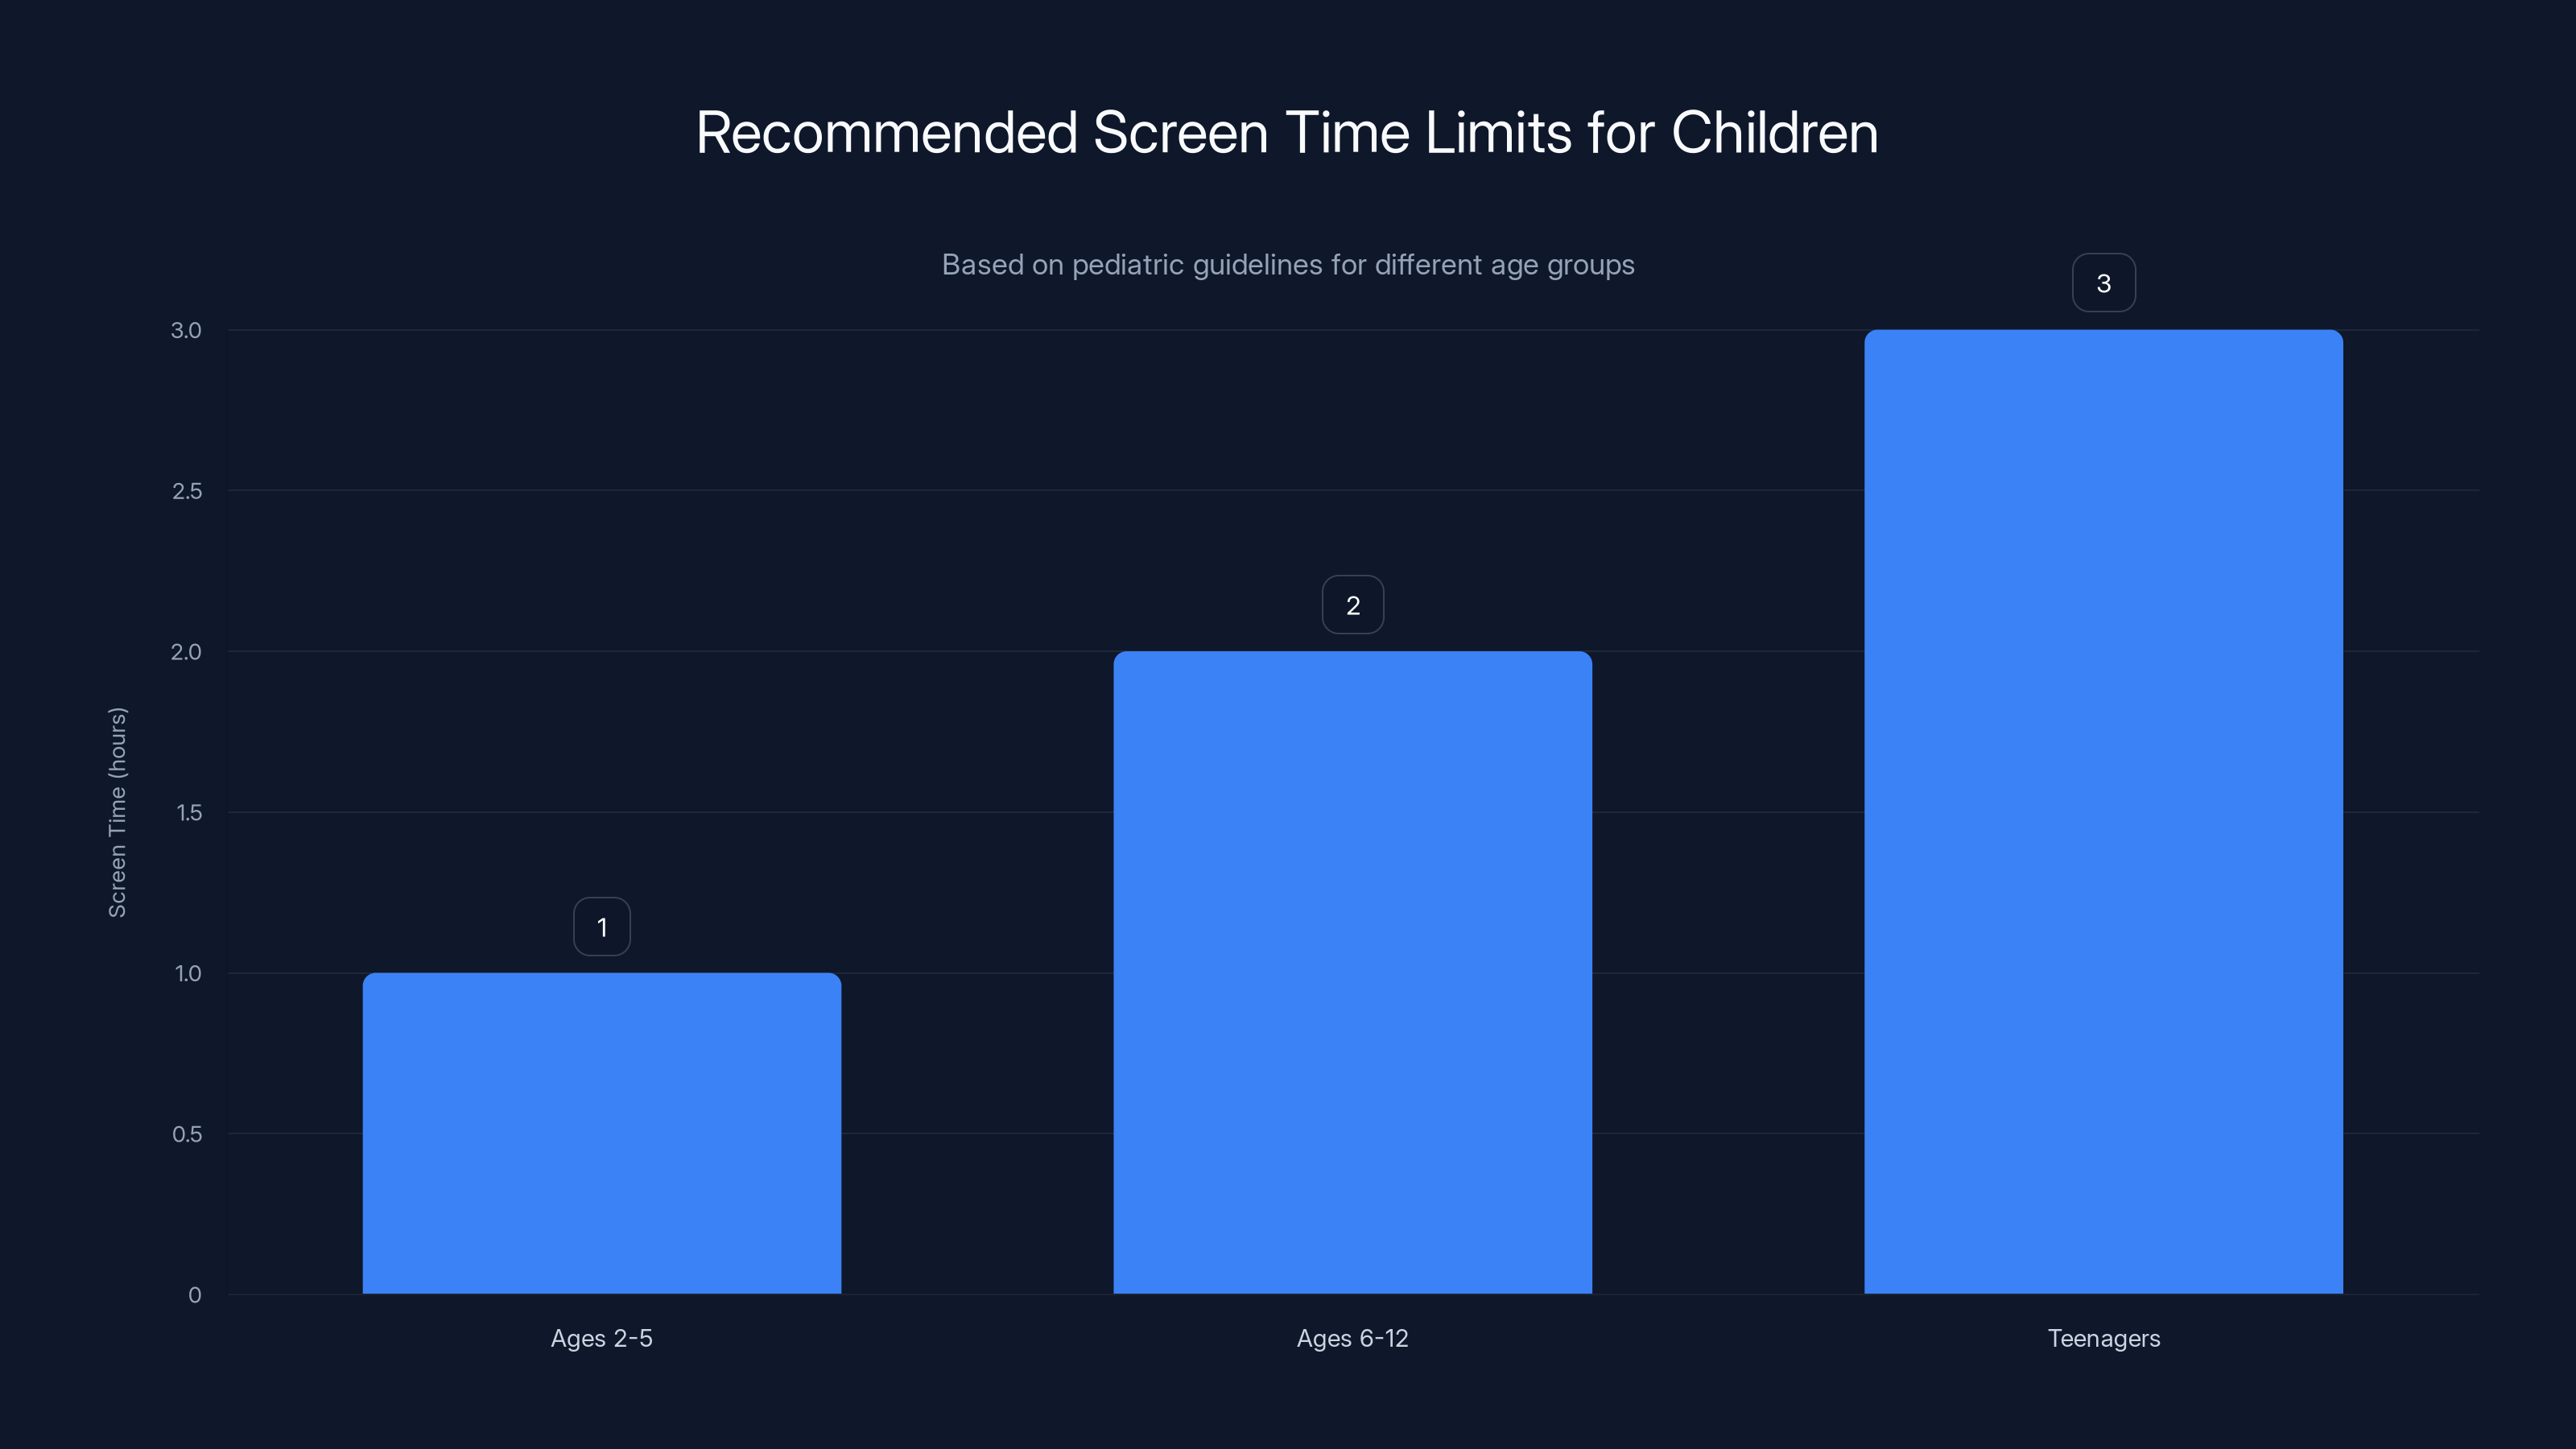
Pediatricians recommend limiting screen time to 1 hour for ages 2-5, 2 hours for ages 6-12, and 3 hours for teenagers to ensure balanced development and well-being.
Step 14: Disable Unnecessary Features and Reduce Distractions
Every feature you disable reduces the chances your child finds something you don't want them to see or gets distracted in ways you didn't intend.
Disabling Multitasking and Split View
Go to Settings > General > Multitasking & Dock. You can restrict Split View, which lets your child run two apps side by side. For a young child, you might want to disable this.
Split View is useful for productivity but can be a distraction. Decide based on your child's age and needs.
Controlling Notification Settings
Go to Settings > Notifications. Notifications from apps can be incredibly distracting. Games send notifications like "Come back! We miss you!" Social media apps send notifications constantly. You can disable notifications for entire categories of apps.
For a young child, disable notifications from Games and Social Networking. For an older child, maybe just disable notifications during Downtime hours.
Managing Background App Refresh
Go to Settings > General > Background App Refresh. You can disable this entirely or manage it per-app. Disabling it saves battery and reduces the chance that apps are doing things behind the scenes without your knowledge.
Step 15: Create a Family Media Plan
Technical controls are only half the solution. The other half is having clear expectations and regular conversations about healthy device use.
Discussing Screen Time Goals
Talk to your child about why you're setting these limits. Explain that it's not to be mean. It's to help them balance screen time with school, sports, friends, and sleep. Ask them what they think is a reasonable amount of time.
You might be surprised. Many kids understand intuitively that too much screen time isn't good for them. They just don't want to admit it.
Setting Expectations for Content
Talk about what content is appropriate and what isn't. Explain why you've restricted certain things. Be honest about the risks: inappropriate content exists, predators exist, and you're trying to protect them until they're old enough to handle those things on their own.
Regular Check-ins
Don't set up parental controls and then disappear. Every week or two, have a conversation about how the iPad is going. Are the limits working? Is there an app they want to try? Did they encounter something that bothered them? These conversations build trust and give your child space to talk about problems.
Step 16: Troubleshooting Common Issues and Support
Things go wrong. Your child forgets their password. You forget your Screen Time code. Apps crash. You need help.
Recovering a Forgotten Screen Time Passcode
If you forget your Screen Time passcode, you'll need to erase the iPad and set it up again from scratch. There's no way to recover a forgotten Screen Time code. This is why you should write it down somewhere safe.
If you haven't forgotten it yet, go to Settings > Screen Time > Change Screen Time Passcode. Use your Apple ID to verify your identity, then set a new code.
Resetting Parental Controls
If you want to completely reset parental controls, go to Settings > General > Reset > Reset All Settings. This removes all parental restrictions and your child's device settings return to defaults. You'll need your Apple ID password to confirm.
Be careful with this. Once you reset, all your work setting up restrictions is gone. Use this only if you're starting completely over.
Getting Help from Apple
Apple offers support through its website, app, and retail stores. If you're confused about how to set something up, call Apple Support or visit an Apple Store. Employees there can walk you through the process step by step.
Step 17: Age-Based Setup Recommendations
The right parental control setup depends on your child's age. Here are recommendations for different age groups.
Ages 4-7: Maximum Protection
At this age, your child should have limited independent iPad use. Most apps should be educational. Screen time limits should be 30-45 minutes per day.
- Downtime: 9 PM to 8 AM
- App Limits: Games 20 minutes, Entertainment 30 minutes, Unrestricted educational apps
- Web Content: Allowed Websites Only
- Communication: Contacts Only
- Ask to Buy: Enabled (you approve all apps)
- Location Sharing: On
- Communication Safety: On
Ages 8-12: Balanced Approach
At this age, your child wants more independence but still needs protection. Educational apps should be unlimited. Entertainment and games should be limited.
- Downtime: 9 PM to 8 AM
- App Limits: Games 45 minutes, Entertainment 1 hour, Social Networking restricted
- Web Content: Limit Adult Websites
- Communication: Contacts Only
- Ask to Buy: Enabled
- Location Sharing: On
- Communication Safety: On
Ages 13-17: Trust with Guardrails
At this age, your child is developing their digital independence. They want privacy, but they still benefit from oversight. Restrictions should feel reasonable or they'll find ways around them.
- Downtime: 10 PM to 7 AM (or negotiated with child)
- App Limits: Negotiated based on school and activities
- Web Content: Limit Adult Websites
- Communication: Less restricted, but still supervised
- Ask to Buy: Might be disabled for small purchases, enabled for larger ones
- Location Sharing: Negotiated (some teens need it for safety, others feel it's invasive)
- Communication Safety: On
According to a survey by the American Psychological Association, teenagers whose parents used reasonable monitoring and open communication reported higher self-esteem and fewer behavioral problems than those with either overly restrictive or completely hands-off parenting approaches. The key is finding balance.
Step 18: Updating and Maintaining Controls as Your Child Grows
Parental controls aren't a "set it and forget it" thing. Your child grows and changes. Your controls should evolve too.
Revisiting Restrictions Yearly
Every birthday or new school year, revisit your parental control setup. What was appropriate last year might be too restrictive now. Your child might be ready for more independence or more responsibility.
Have a conversation: "You're getting older. We're going to adjust your iPad settings. Here's what we're changing and why. Here's what we're not changing."
Teaching Digital Responsibility
As your child gets older, the goal should be to teach them to make good decisions themselves, not to rely on parental controls forever.
Use the restrictions to buy time while they develop judgment. Talk about the decisions you're making. Explain why some content is restricted, why time limits exist, and what the risks are.
Eventually, maybe around age 15-16, gradually remove some restrictions and trust your child to self-regulate. That's the real goal of parental controls: not surveillance, but support until your child is ready to make their own decisions.
Step 19: Additional Privacy Tools Beyond Family Sharing
Apple offers other privacy and security features beyond parental controls. Use these in addition to Screen Time and Content Restrictions.
App Privacy Report
Go to Settings > Privacy > App Privacy Report. This shows you which apps have accessed sensitive data over the past seven days. You can see which apps accessed your location, contacts, photos, camera, microphone, and more.
Review this report occasionally. If an app has accessed something you don't expect, you can revoke that permission or delete the app.
Transparency and Consent
When an app wants permission to access sensitive data, your child gets a prompt. This prompt is important. Don't let your child dismiss it without understanding what they're allowing. Explain: "This app wants to access your location. Do you think it needs that?"
Privacy Settings for Different App Categories
Some app categories are riskier than others. Video calling apps need camera and microphone access, which makes sense. But a game probably shouldn't need your child's location or contacts.
Before approving an app, think about what permissions it really needs. If it doesn't make sense, deny the permission. If the app doesn't work without that permission, delete the app.
Step 20: Staying Updated with iOS Changes and New Features
Apple updates iOS regularly. New parental control features get added. Old features change. You need to stay informed.
Checking for iOS Updates
Go to Settings > General > Software Update. Your child's iPad should update automatically when it's plugged in and on Wi-Fi, but you can also force an update here.
When iOS updates, parental control settings usually stay the same, but new options might appear. Spend five minutes reviewing the Screen Time and Content Restriction settings after a major update to see if anything new has been added.
Reading Release Notes
When a new iOS version comes out, Apple publishes release notes. If you're interested in parental control changes, you can read these notes on Apple's website. They highlight new features and changes that might affect your setup.
Testing Changes
Before rolling out a major change to your child's parental controls, test it yourself if possible. If you have your own iPad, adjust the settings and see how they affect the experience. This helps you avoid unintended consequences.
FAQ
What is Family Sharing and why do I need it?
Family Sharing is Apple's ecosystem for managing multiple devices and accounts across a family unit. It's the foundation for all parental controls on Apple devices. Without it, you can't set up Screen Time limits, approve app purchases, or monitor your child's device usage. Family Sharing lets up to six people share a group, with the organizer (you) able to supervise child accounts and manage shared subscriptions and storage. It's essential if you want to use Apple's parental control features.
How do I create an Apple ID for a child under 13?
On your own iPhone or iPad, go to Settings > [Your Name] > Family > Add Member > Create Child Account. Apple will ask for your child's name, birth date, and parental consent (using your Apple ID password). The account is created automatically and added to your Family Sharing group. You don't need to do anything else. If your child is 13 or older, they can create their own Apple ID, but you can still add it to Family Sharing for supervision.
What's the difference between Screen Time passcode and the iPad unlock code?
The iPad unlock code (Face ID, Touch ID, or numeric passcode) unlocks the device. The Screen Time passcode prevents changes to Screen Time settings and limits. You can set them to the same code, but Apple recommends making them different. If your child knows the Screen Time passcode, they can disable downtime or increase app limits. If they know the unlock code but not the Screen Time passcode, they can use the iPad but can't change your restrictions. Write down your Screen Time passcode somewhere safe. If you forget it, the only way to get back into the settings is to erase the iPad and set it up again.
Can my child turn off Screen Time and parental controls?
No, not without your Screen Time passcode. If you've configured Screen Time correctly, your child cannot disable restrictions, change app limits, or bypass content filters without entering your passcode. This is why the passcode is so important. Keep it somewhere your child can't find it, and don't tell them what it is. If you want to allow them to request more time or access to restricted apps, that request goes to you for approval. The restrictions stay in place.
What happens if my child reaches their app time limit?
When they reach the limit, the app becomes grayed out and inaccessible. They get a notification a few minutes before the limit is reached, so they know it's coming. They can request more time, and the request goes to you. You can approve the request (allowing them 15 more minutes) or deny it (enforcing the limit). If the app is in the "Always Allowed" section, it remains accessible even after the limit is reached.
How do I monitor what my child is doing on their iPad?
Go to Settings > Screen Time and look at the usage report. You'll see which apps your child used, how many times they opened each app, and how much total screen time they accumulated. You can see this information in real-time on your own device if your child is part of your Family Sharing group. Go to your own Settings > Family > [Child's Name] > Screen Time to see their usage report. You can also use the Find My app to see their device location and the Find My app's notification feature to see when they unlock their device.
Is it okay to use location sharing to monitor my child?
Yes, but context matters. For young children, location sharing is a valuable safety tool. You can verify they're where they said they'd be. For teenagers, location sharing can feel invasive. Some experts recommend being transparent about it: "I'm using location sharing so I can help you if you're in an emergency, not to spy on you." Others recommend negotiating: "You can have more privacy, but I need to know you're safe." There's no universal right answer. It depends on your family's values and your child's age.
What should I do if my child encounters inappropriate content?
First, don't panic or blame them. Stay calm and use it as a teaching moment. Ask questions: "Where did you see this?" "Did someone send it to you?" "Do you know how to report it?" Explain why you've set up restrictions and that your job is to protect them. If the content was shared by someone who contacted your child, take it seriously and consider reporting it to the platform. If you're concerned about predatory behavior, contact local law enforcement or the National Center for Missing & Exploited Children (NCMEC).
Can I set different restrictions for different apps?
Yes, through Content & Privacy Restrictions. You can block certain apps entirely in the Restrictions section. You can set time limits for app categories (games, entertainment, social networking) through App Limits. You can restrict which websites are accessible in Safari. You can control which permissions apps have (camera, microphone, location, contacts). But you can't set a 30-minute daily limit on one game and a 45-minute limit on another game. Limits are set by category, not by individual app. If you need app-specific control, use the blocking or allowance features instead.
How often should I review my child's Screen Time report?
At least weekly, especially when you first set up parental controls. You're looking for patterns: Is my child staying within limits? Are they using appropriate apps? Are there new apps I haven't reviewed? After the first month, you can reduce to a monthly review. The goal isn't surveillance. It's understanding your child's digital habits and being ready to adjust restrictions if needed. If something looks concerning (a new app you've never heard of, unusual late-night usage, skyrocketing screen time), investigate and talk to your child.
What's the best age to start letting my child have their own Apple ID?
Apple requires parental supervision for accounts created before age 13. At age 13, your child can create their own account without parental involvement, though you can still add it to Family Sharing for supervision. Practically speaking, many children ask for their own device and Apple ID around age 8-10. At that point, you can create a managed account for them. As they get older (13-16), you can gradually reduce supervision if they've demonstrated responsibility. By age 16-17, most teens have full control over their own accounts, though you might still use Family Sharing for shared subscriptions and shared storage.

Conclusion: Creating a Balanced Digital Environment
Setting up an iPad for your child with proper parental controls isn't about locking them out of the digital world. It's about creating a safe, age-appropriate environment where they can explore, learn, and grow while you guide them toward healthy habits.
The process takes time—maybe 30 minutes of hands-on work—but it's time well spent. You're not just configuring settings. You're making a statement about what your family values and what you're willing to accept in your child's digital life.
Start with the basics: create an Apple ID, set up Family Sharing, enable Screen Time with reasonable limits, and turn on Content & Privacy Restrictions. These four things create a solid foundation. Then fine-tune based on your child's age, maturity level, and what you want them to have access to.
Remember that controls alone aren't enough. The technology is just scaffolding. The real work is having conversations with your child about why these limits exist, what the risks are, and what healthy device use looks like. Kids who understand the "why" behind restrictions are more likely to follow them and less likely to resent you for implementing them.
Your goal should be to gradually reduce your oversight as your child gets older and demonstrates better judgment. By the time they're 16 or 17, they should understand how to make good digital decisions without your active supervision. Parental controls are a tool for teaching, not a lifetime solution.
One last thing: be realistic about enforcement. Your kid will test boundaries. They'll ask for longer downtime, more app time, or permission to access a restricted website. Sometimes you'll say yes. That's fine. Being a parent is about judgment, not rigid rules. Use the tools Apple provides, but trust your instincts about what's right for your family.
Your child's digital safety matters. You're taking that seriously by setting up these controls. Well done.
Related Reading:
- How to set up an Apple Watch for a child
- Best parental control apps for iOS
- Teaching kids digital responsibility
- Screen time and child development: what research shows
- How to talk to kids about internet safety
Key Takeaways
- Create a managed Apple ID for children under 13 directly from your own device to establish parental oversight from the start
- Enable Family Sharing to link your child's account to your family group, unlocking all parental control features
- Configure Screen Time with downtime hours (9 PM to 8 AM), app category limits (20-45 minutes for games), and communication restrictions
- Turn on Content & Privacy Restrictions to filter inappropriate content, control in-app purchases, and manage app permissions
- Use a multi-layered approach combining Screen Time, content filters, location sharing, and regular monitoring to create a comprehensive safe environment
- Adjust parental controls as your child ages, gradually reducing restrictions as they demonstrate digital responsibility and maturity
- Combine technical controls with open conversations about device use, digital safety, and healthy screen time habits

